
Look at the bottom edge of the shirt you are wearing. It might curve up at the sides and dip at the front and back. It might be cut straight across, with a clean line meant to be worn loose. It might end in a band, like a sports shirt, or in a tiny rolled edge so thin it looks like a thread. All of these are different ways to finish the hem of a shirt, and each one changes how the shirt looks, hangs and lasts.
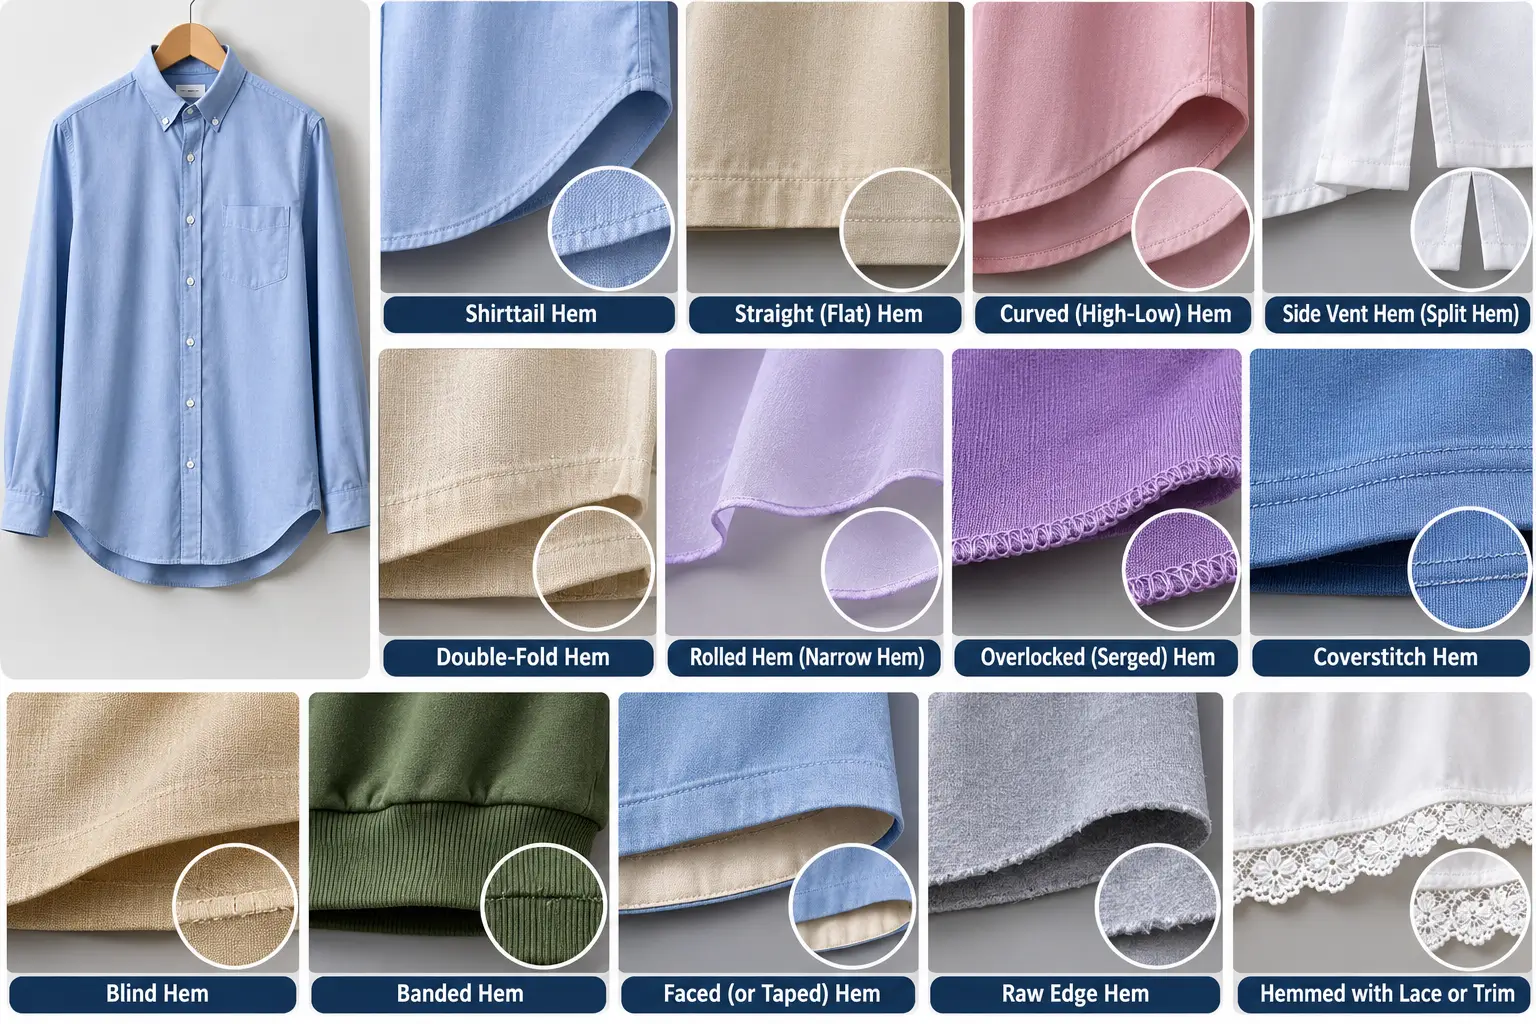
This guide explains the common types of shirt hem, how each is stitched, the allowances and stitch settings used in factories, and the problems to watch for. It includes worked examples for hem length, sewing time and thread use. To see where the hem sits in the garment, read our guides on the different parts of a shirt and the parts of a T-shirt.
What is a hem
A hem is the finished edge of a piece of fabric, made by folding the raw edge over and stitching it down. Its jobs are to:
- Stop fraying. A cut edge unravels. A hem hides it.
- Add weight. A hem adds a little weight at the bottom, which helps the shirt hang straight.
- Set the length. The hem is the line that defines where the shirt ends.
- Give a neat look. A clean hem is a sign of good quality.
The hem of a shirt is at the bottom edge of the body, but the word is also used for sleeve hems, cuff edges and pocket tops.
Main types of shirt hem
1. Shirttail hem
The classic dress shirt hem. The front and back dip lower than the sides, in a gentle curve, so the shirt can be tucked in without bulk at the hip. It is usually finished with a very narrow hem, about 3 to 6 mm wide, made on a lockstitch machine with a folder. Because the edge is curved, the hem must be sewn with care to avoid puckering.
2. Straight (flat) hem
The bottom edge is cut straight across, at the same length at the front, back and sides. It is made for shirts worn out, such as casual and camp shirts, and for men’s shirts with side vents. A straight hem is normally a bit wider than a shirttail hem, around 1 to 2 cm.
3. Curved hem
Like a shirttail, but with a deeper curve. Some hems form a high-low shape, with a shorter front and longer back.
4. Side vent hem (split hem)
The sides have short slits at the hem so the shirt hangs freely. Vents are common in untucked shirts and tunics. The vent edges are hemmed first, then the bottom hem is sewn, with a small bar tack at the top of each vent for strength.
5. Double-fold hem
The raw edge is folded twice, to the inside, and stitched. This is the standard hem for woven fabrics, and gives a clean look inside and outside. The finished width is commonly 1 to 2 cm.
6. Rolled hem (narrow hem)
The edge is rolled into a very narrow tube and stitched. It suits light woven fabrics such as voile and chiffon, where a wider hem would show through. It can be made with a rolled-hem foot or a folder.
7. Overlocked (serged) hem
The edge is finished with overlock stitches and sometimes left raw as a design feature. A rolled overlock version gives a narrow rolled edge with dense stitches. Common on light fabrics and knits, and in decorative styles.
8. Coverstitch hem
On knit shirts and tees, the hem is folded once and sewn with a coverstitch machine. Two or three parallel lines show on the outside, and a looped chain on the inside. It stretches with the fabric, so the hem does not snap. See our guide on the flatlock machine for the stitch family.
9. Blind hem
The hem is stitched so that the stitches are almost invisible from the outside. Used for formal wear and fine fabrics, where the look is clean, with no visible line.
10. Banded hem
A separate band of fabric, often ribbed knit, is sewn to the bottom edge. It pulls the shirt gently in at the hem and is common in sweatshirts, sports shirts and bomber styles.
11. Faced or taped hem
A strip of fabric or tape is stitched to the edge and turned inside. It gives a flat finish for curved or thick hems, and adds structure.
12. Raw edge hem
The fabric is cut and left unfinished, which works in knits that do not fray, such as jersey. It gives a casual, modern look, but can curl.
13. Hemmed with lace or trim
Lace, bias tape or ribbon finish the edge for decoration.
Quick comparison
| Hem type | Look | Best for | Typical finished width | Machine |
|---|---|---|---|---|
| Shirttail | Curved, narrow | Dress shirts, tuck-in styles | 3 to 6 mm | Lockstitch with folder |
| Straight | Flat, clean | Casual, camp, untucked shirts | 10 to 20 mm | Lockstitch |
| Curved or high-low | Fashion curve | Women’s tops, tunics | 6 to 12 mm | Lockstitch or coverstitch |
| Side vent | Open sides | Untucked shirts | 6 to 12 mm | Lockstitch, bar tack |
| Double-fold | Clean on both sides | Woven shirts | 10 to 20 mm | Lockstitch |
| Rolled | Very thin edge | Voile, chiffon, silk | 2 to 4 mm | Lockstitch with rolled hem foot |
| Overlocked | Decorative edge | Light wovens, knits | 2 to 5 mm | Overlock |
| Coverstitch | Parallel lines | T-shirts, polos, knits | 15 to 25 mm | Coverstitch or flatlock |
| Blind | Almost invisible stitches | Formal, tailored | 15 to 30 mm | Blind stitch machine |
| Banded | Elastic gather | Sportswear, sweatshirts | 40 to 60 mm band | Overlock or coverstitch |
Hem allowance in the pattern
The pattern has to include extra fabric for the hem. The amount depends on the type.
| Hem type | Hem allowance added |
|---|---|
| Narrow shirttail (folder) | About 1 cm |
| Standard double-fold | Twice the finished width plus a few millimetres, e.g. 2 to 2.5 cm for a 1 cm hem |
| Straight hem, wider | 2.5 to 4 cm |
| Rolled hem | About 1 cm |
| Coverstitch hem on knits | 2 to 3 cm |
| Blind hem | 3 to 4 cm |
A double-fold hem uses twice its finished width. A 1 cm finished double-fold hem needs 2 cm of fabric plus a tiny extra, because the fabric is turned in on itself twice. Always confirm the allowance in the spec sheet. Our guide to the garment spec sheet shows where this information is recorded.
Stitching details used in factories
| Item | Common setting for a woven shirt hem |
|---|---|
| Stitch type | ISO 301 lockstitch for woven shirts |
| Stitch density | About 12 to 14 stitches per inch (SPI), higher on thin fabric |
| Needle | Size 9 to 11 (metric 65 to 75) with a fine sharp point for tight wovens |
| Thread | Core-spun or spun polyester, tex 24 to 30 |
| Hem width | Narrow, 3 to 6 mm for shirttail, folder-guided |
| Tolerance on width | Typically plus or minus 1 mm for narrow hems, set by buyer |
| Stitch position | Close to the fold, usually 1 to 2 mm from the edge |
| Machine attachments | Hemmer or folder, edge guide |
For knit shirts with a coverstitch hem, the stitch is ISO 406 or 407 or similar, at about 8 to 10 stitches per inch, with a stretchy textured thread in the looper. The needle should be a ball-point type for knits. See our guide on sewing needles.
Attachments
The folder or hemmer is the heart of a clean shirt hem. It guides the edge into two folds just before the needle, so the operator does not need to fold by hand. The width of the folder sets the width of the hem. Different widths and curves need different folders. For more on this and other attachments, read our guide on sewing machine presser feet types.
How to sew a shirttail hem: step by step
- Mark and trim. Mark the curve from the side seam to the front and back. Trim to the shape with a sharp pair of scissors, or cut it in the pattern.
- Staystitch the curve. Sew a line of stitches 5 mm from the edge to stop the curve from stretching.
- Press the first fold. Fold the edge 3 mm to the wrong side and press. Use steam to ease the curve.
- Press the second fold. Fold again by 3 mm so the raw edge is hidden. Press.
- Pin or clip. Hold the fold with a few pins or clips.
- Stitch. Sew close to the inner fold, at about 12 to 14 stitches per inch.
- Press the hem again. Pressing sets the stitches and removes ripples.
In the factory, step 3 to 4 is done by the folder, and the pressing is done after sewing.
Worked example 1: hem length
A shirt has a flat sweep (bottom width) of 56 cm, so the circumference is 56 × 2 = 112 cm. The shirttail curve makes the hem line longer than the straight line. Say the curve adds 8 percent.
- Hem length = 112 × 1.08 = 121 cm
This is the length of the seam the operator will sew. Add 2 cm at the start and the end for overlap and backtack, so about 125 cm in total.
Worked example 2: sewing time
A lockstitch machine runs at 4,000 stitches per minute. The stitch density is 13 stitches per inch, which is 13 ÷ 2.54 = 5.12 stitches per cm.
- Sewing speed = 4,000 ÷ 5.12 = 781 cm per minute
- Time to sew 125 cm = 125 ÷ 781 = 0.16 minute, about 9.6 seconds
At full speed the hem takes under 10 seconds. In real lines, handling, turning and trimming add time. If the standard minute value (SAM) of this operation is 0.35, then the pure stitching is 0.16 ÷ 0.35 = 46 percent of the time. The rest is handling. This is why work aids and folders are valuable, and why a faster motor alone does little. See our article on productivity vs production for how SAM links to output.
If an operator works at 85 percent efficiency for 480 minutes:
- Pieces per day = 480 × 0.85 ÷ 0.35 = 1,166 hems
Worked example 3: thread use
For a double-fold lockstitch hem, thread use is roughly 3 to 4 times the seam length, counting both needle and bobbin thread, because of the thickness of the folded fabric. Use 3.5 as a working figure and measure on your own machine.
- Thread per shirt = 1.25 m × 3.5 = 4.4 m
- For 10,000 shirts = 4.4 × 10,000 = 44,000 m
- A cone holds 5,000 m, so 44,000 ÷ 5,000 = 8.8, about 9 cones for the hem alone
Common hem problems and fixes
| Problem | Likely cause | Fix |
|---|---|---|
| Puckered hem | Tension too tight, stitch too short, fabric stretched | Lower tension, check stitch length, do not pull the fabric |
| Wavy or rippled hem | Curved edge stretched while sewing | Staystitch, use a folder, ease the curve |
| Uneven hem width | Poor guide, operator error | Fix the folder, train the operator |
| Raw edge peeking out | Fold too small or slipping | Adjust the folder, press properly |
| Hem line not straight | Cutting error or poor marking | Check the pattern and cutting |
| Skipped stitches on knits | Wrong needle | Use a ball-point needle |
| Hem pulls up after washing | Shrinkage or thread shrinking | Pre-shrink, choose thread that matches. See shrinkage control |
| Hem too stiff | Too much interlining or tight stitching | Remove interlining, loosen stitches |
| Visible stitches in a blind hem | Needle going too deep | Adjust needle depth |
| Hem snaps on knits | Lockstitch used on stretch fabric | Use a coverstitch or stretch stitch |
Choosing the right hem
- Tuck-in dress shirt: Shirttail hem, narrow.
- Casual untucked shirt: Straight hem with side vents.
- Women’s blouse: Curved or high-low, narrow or rolled.
- Light chiffon or silk: Rolled hem or blind hem.
- T-shirt and polo: Coverstitch hem.
- Sports shirt: Banded or coverstitch hem.
- Heavy fabric (denim, twill): Double-fold hem with a wider width, which also adds weight. See twill weave.
Quality checks for shirt hems
- Hem width is consistent along the whole hem, within tolerance.
- Stitches are even, with no skipped or broken stitches.
- The hem lies flat, with no pleats or ripples.
- Thread colour and tension match the fabric.
- Start and end of the stitching overlap neatly, with backtack.
- The side seam match at the hem line.
- The hem length measures within the tolerance in the spec.
- Pressing is clean, with no shine or marks.
Final thoughts
The hem of a shirt is a small detail that people notice without knowing why. A narrow, even shirttail hem tells you a dress shirt is well made. A flat coverstitch hem on a T-shirt tells you it will survive many washes. Choose the hem type for the fabric and style, set the allowance in the pattern, use the right machine and folder, and check width and flatness on every batch. A good hem finishes the shirt in more ways than one.
Frequently asked questions
It is the finished bottom edge of the shirt, made by folding the raw edge over and stitching it.
It is a curved hem that is longer at the front and back than at the sides. It is common on dress shirts that are tucked in.
A shirttail hem is narrow, around 3 to 6 mm. A straight hem is wider, around 1 to 2 cm. The right width depends on the fabric and style.
A lockstitch is used for woven shirts. A coverstitch is used for knit shirts and T-shirts because it stretches.
For a double-fold hem, add twice the finished width plus a few millimetres. A 1 cm hem needs about 2 to 2.5 cm.
Stay-stitch the curve, press the folds with steam and use a folder. Do not pull the fabric when you sew.
It is a hem where the stitches are almost invisible from the right side, used on formal and fine fabrics.