A factory gets an order for 20,000 shirts. The buyer sends a folder. Inside is one file that decides almost everything that happens next: the spec sheet. It tells the factory how long the sleeve must be, how wide the chest must be, which thread to use, which label to sew and where. If the spec sheet is clear, production runs smoothly. If it is confusing, the shirts come out wrong.
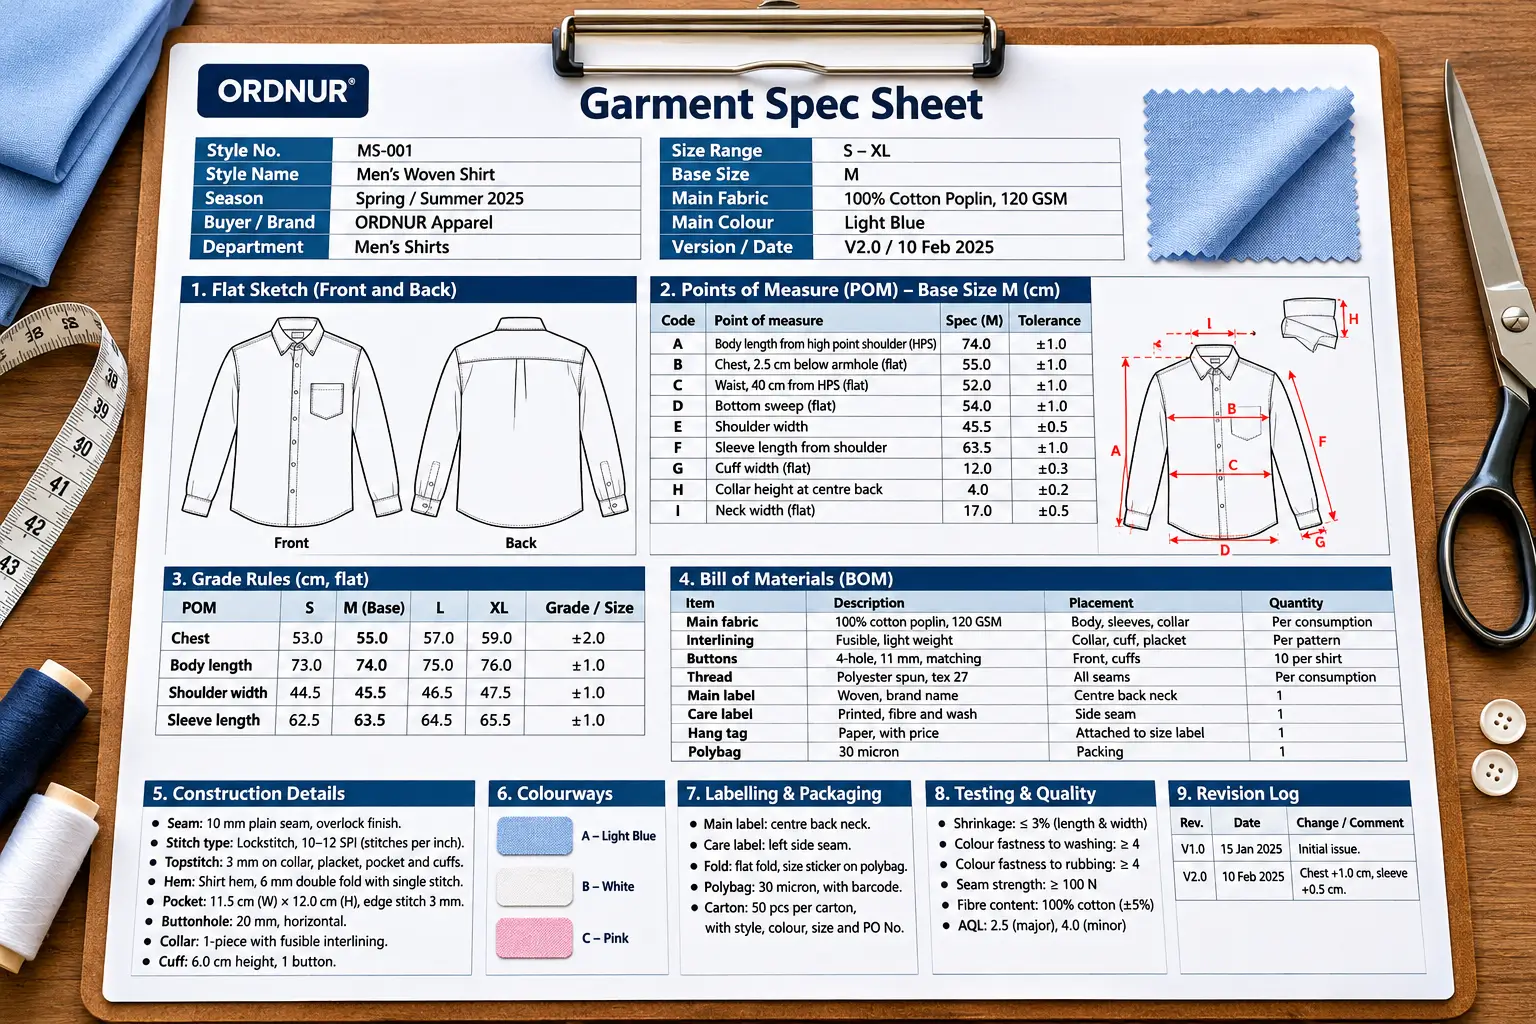
This guide shows you what a garment spec sheet contains, how to read each part and what the numbers mean. It includes a worked example of checking a sample against the spec, and another of working out the fabric needed from the measurements. If you want a fuller picture of the package that often comes with it, see our guide on the tech pack for clothing. Here, the angle is simple: how to read a spec sheet well and avoid mistakes.
What is a spec sheet
A spec sheet, short for specification sheet, is a document that describes a garment in detail so that anyone can make it the same way. It lists measurements, materials, construction, colours, labels and packing. Buyers, designers or merchandisers write it. Factories use it to cut, sew, check and ship.
You may hear several names for similar documents.
| Name | What it usually means |
|---|---|
| Spec sheet | The measurements and key details of one style |
| Measurement chart | Just the table of sizes and points of measure |
| Tech pack | A fuller package: spec sheet plus sketches, BOM, construction, artwork and more |
| Style sheet | A one-page summary of a style |
| Work order or cutting sheet | An internal factory sheet made from the spec |
In small shops the words are used loosely. What matters is that the information is complete and clear.
Who uses the spec sheet
- Designers and product developers write the first version.
- Merchandisers pass it to the factory and track changes.
- Pattern makers build the pattern to match the measurements.
- Cutting and sewing teams follow the construction notes.
- Quality controllers compare samples and bulk garments against it.
- Buyers approve each stage against it.
Main parts of a spec sheet
1. Header information
The top of the sheet identifies the style.
- Style number and name
- Season and delivery date
- Buyer or brand and department
- Size range and base (sample) size
- Fabric type and main colour
- Version number and date of the last change
Check the version number before you start. Using an old version is a common cause of errors.
2. Flat sketch
This is a simple line drawing of the front and back, drawn flat with no body. It shows seams, pockets, collars, buttons, stitching lines and any special feature. Arrows and numbers connect to notes.
3. Points of measure (POM)
This is the heart of the sheet. A POM is a named spot where a measurement is taken. Each POM has a code, a description, the measurement for each size and a tolerance.
Example for a men’s woven shirt in base size M, measured flat in centimetres:
| Code | Point of measure | Spec (M) | Tolerance |
|---|---|---|---|
| A | Body length from high point shoulder | 74.0 | ±1.0 |
| B | Chest, 2.5 cm below armhole | 55.0 | ±1.0 |
| C | Waist, 40 cm from HPS | 52.0 | ±1.0 |
| D | Bottom sweep | 54.0 | ±1.0 |
| E | Shoulder width | 45.5 | ±0.5 |
| F | Sleeve length from shoulder | 63.5 | ±1.0 |
| G | Cuff width | 12.0 | ±0.3 |
| H | Collar height at centre back | 4.0 | ±0.2 |
| I | Neck width | 17.0 | ±0.5 |
Note whether numbers are flat or around. Most are flat, so the real chest circumference is 55 × 2 = 110 cm. See our guide on leg opening and other pant measurements for the same idea in trousers, and the measurement of top and bottom garments for the method.
4. Grade rules
The spec gives measurements for the base size. Other sizes follow grade rules, which are the steps up or down between sizes.
| POM | S | M (base) | L | XL |
|---|---|---|---|---|
| Chest | 53.0 | 55.0 | 57.0 | 59.0 |
| Body length | 73.0 | 74.0 | 75.0 | 76.0 |
| Shoulder | 44.5 | 45.5 | 46.5 | 47.5 |
| Sleeve length | 62.5 | 63.5 | 64.5 | 65.5 |
Here the chest grade is 2 cm per size flat, and the length grade is 1 cm. See our guide on pattern grading.
5. Tolerances
A tolerance is the allowed difference between the spec and the actual garment, shown as plus and minus. A chest tolerance of ±1.0 means the garment passes between 54.0 and 56.0 for the base size. Tolerances differ by point. Length and width points are usually looser than neck and collar points. Always use the number in your own buyer’s sheet.
6. Bill of materials (BOM)
The BOM lists every material in the garment.
| Item | Description | Placement | Quantity |
|---|---|---|---|
| Main fabric | 100% cotton poplin, 120 GSM | Body, sleeves | Per consumption |
| Interlining | Fusible, light weight | Collar, cuff, placket | Per pattern |
| Buttons | 4-hole, 11 mm, matching | Front, cuffs | 10 per shirt |
| Thread | Polyester spun, tex 27 | All seams | Per consumption |
| Main label | Woven, brand name | Centre back neck | 1 |
| Care label | Printed, fibre and wash | Side seam | 1 |
| Hang tag | Paper, with price | Attached to size label | 1 |
| Polybag | 30 micron | Packing | 1 |
7. Construction details
This section tells the sewing team how to build the garment.
- Stitch types and stitch density (stitches per inch)
- Seam types, such as plain seam, French seam, flat felled seam
- Hem and cuff finishes
- Pocket and placket details
- Topstitch width
- Button placement and buttonhole size
Seam types follow standards. Our guide on the types of seams in garments explains them. Hem details are covered in our guide on shirt hem types and stitching.
8. Colourways and artwork
This part lists the colour names or codes and shows where prints, embroidery or labels go. It gives their sizes, positions and colours. Placement is often marked from a fixed point, such as “5 cm below the neck seam, centred”.
9. Labelling, packaging and shipping
The sheet shows how to fold, pack and label the garment: poly bag size, carton marking, barcodes and the number of pieces per carton.
10. Quality and testing requirements
It may list tests, such as shrinkage, colour fastness, seam strength and fibre content. Limits for each are stated. See our guides on colour fastness tests and shrinkage control.
11. Revision log and comments
Changes after the first version are recorded with date, who asked, and what changed. A good log saves arguments later.
How to read a spec sheet in 10 steps
- Check the version number and date.
- Read the header and the size range.
- Look at the flat sketch and understand the shape.
- Read the notes next to the sketch.
- Scan the POM table and note which points have tight tolerances.
- Read the construction section for stitches and seam types.
- Check the BOM against the materials you hold.
- Look at the colours and artwork.
- Read the labelling and packing details.
- Write down any question and send it before starting, not after.
Worked example 1: checking a sample
A factory sends a size M sample shirt. The quality team measures it flat and compares it with the spec.
| Code | Point | Spec | Tolerance | Actual | Difference | Result |
|---|---|---|---|---|---|---|
| A | Body length | 74.0 | ±1.0 | 74.5 | +0.5 | Pass |
| B | Chest | 55.0 | ±1.0 | 53.6 | −1.4 | Fail |
| C | Waist | 52.0 | ±1.0 | 51.5 | −0.5 | Pass |
| E | Shoulder | 45.5 | ±0.5 | 46.2 | +0.7 | Fail |
| F | Sleeve length | 63.5 | ±1.0 | 63.0 | −0.5 | Pass |
| G | Cuff width | 12.0 | ±0.3 | 12.2 | +0.2 | Pass |
Two points fail: chest is 1.4 cm too small, and the shoulder is 0.7 cm too wide. The chest being smaller than spec may point to a pattern error or to shrinkage. The shoulder being wider may show cutting variation. The factory must find the cause, fix it and send a new sample. Our guide on defects vs defectives in garments explains how such faults are counted.
Worked example 2: fabric needed from the spec
A merchandiser wants a quick estimate of fabric for a T-shirt with these spec measurements, flat:
- Body length: 70 cm
- Sleeve length: 20 cm
- Chest width: 52 cm
- Fabric weight: 180 GSM
A common rule of thumb for a basic tee is:
Area per piece = (body length + sleeve length + allowance) × (chest width + allowance) × 2
Use allowances of 6 cm for length (hems and seams) and 4 cm for width.
- Length term = 70 + 20 + 6 = 96 cm
- Width term = 52 + 4 = 56 cm
- Area = 96 × 56 × 2 = 10,752 cm², or 1.0752 m²
Weight per piece = 1.0752 m² × 180 g/m² = 193.5 g
Add 8 percent for cutting waste: 193.5 × 1.08 = 209 g per shirt.
For one dozen: 209 × 12 = 2,508 g, or about 2.51 kg.
For 20,000 pieces: 209 × 20,000 = 4,180,000 g = 4,180 kg, or about 4.2 tonnes.
This is an estimate for planning. Real consumption comes from a marker made on the cutting table or software, and depends on the size mix, the layout and the fabric width. See the parts of a T-shirt for the pieces that make up the cutting list.
Where the spec sheet fits in the sample approval path
A spec sheet is not used once and put away. It follows the garment through every stage.
| Stage | How the spec sheet is used |
|---|---|
| Proto sample | The first rough sample is made from the sketch and key measures |
| Fit sample | Measured against the spec. Fit comments are written on the sheet |
| Size set | Samples in several sizes are checked against the grade rules |
| Pre-production sample | Final check of materials, labels and construction before bulk |
| Cutting | The cutting team uses the measurements and pattern to start |
| Inline inspection | Quality staff measure garments on the sewing line against the spec |
| Final inspection | A sample of finished pieces is measured and checked to the tolerance |
| Shipping | Packing details are checked against the sheet |
At each step, the buyer or the factory may change a measurement. Each change must go back into the sheet with a new version number. This is how a team stays in step even when people work in different cities and time zones.
Common mistakes with spec sheets
- Mixing flat and around measurements. A chest given flat as 55 cm is not the same as 55 cm around.
- Different units. Inches in one part and centimetres in another.
- Old versions. A change made in a late version is missed.
- Missing tolerances. Without them, nobody knows what passes.
- Unclear POM definition. “Chest” can be taken at several heights. Define it.
- No grade rules. The factory guesses and sizes do not match.
- Vague construction notes. “Neat finishing” means different things to different people.
- BOM missing small items. Hang tags, size labels and polybags are forgotten, which delays shipping.
- Not updating after sample comments. Fit comments must flow into the spec.
Tips for writing a good spec sheet
- Use one template for all styles so people know where to look.
- Add photos of the first sample with measurements.
- Keep the language short and exact.
- Record every revision.
- Include a measurement guide that shows how each POM is taken, with arrows on a drawing.
- Send the spec with the pattern or sample, not alone.
- Agree on the tolerance for each point before production starts.
Final thoughts
A spec sheet is the shared language between the person who designs a garment and the person who makes it. Learn the parts, check the version, read the tolerances and ask questions early. Take care with flat versus around figures, and keep a revision log. A clear spec sheet saves samples, time and money, and it makes it much more likely that the garment you ordered is the garment you get.
Frequently asked questions
It is a document that lists the measurements, materials, construction details, colours and packing of a garment style so it can be made and checked consistently.
A spec sheet focuses on measurements and key details. A tech pack is a larger package that includes the spec sheet, sketches, BOM, construction, artwork and more.
POM means point of measure. It is a defined spot on the garment where a measurement is taken.
It is the allowed difference from the stated measurement, such as plus or minus 1 cm.
Usually the designer, product developer or merchandiser at the brand. Factories may also prepare one from a sample.
BOM means bill of materials. It lists all the fabrics, trims, labels and packing items used in the garment.
Most are taken flat, and the sheet should say so. Double the flat figure to find the circumference.