Open the accessory box that came with a sewing machine and you will usually find a small bag of odd-shaped metal and plastic pieces. They look alike at first. Yet each one changes how the machine handles fabric. The part you swap most often is the presser foot, and picking the right presser foot for sewing machine work can turn a hard job into an easy one.
This guide explains what a presser foot does, how feet attach to the machine and the most useful types, from the zigzag foot to the walking foot. For each one you will learn what it is for and when to use it. We also cover how to choose, how to fix common problems and a worked example of how a simple foot can save production time. To see where the foot sits on the machine, read our guides to the parts of a sewing machine and their functions and sewing machine parts.
What is a presser foot
The presser foot is the small part at the bottom of the needle bar that holds the fabric flat against the feed dogs while you sew. The feed dogs are the teeth under the plate that pull the fabric along. Without the foot, the fabric would lift with the needle and the stitches would skip or tangle.
The foot does four jobs:
- Holds the fabric firmly against the feed dogs.
- Guides the fabric so the seam is straight.
- Lets the needle through by a hole or slot that is wide enough for the stitch width.
- Shapes the work, as special feet fold, gather, pleat or guide trims.
A lever at the back of the machine lifts and lowers the foot. Always lower it before you start sewing. Sewing with it up creates loops of thread underneath that are hard to remove.
How presser feet attach
Feet fit the machine in different ways. Check which type you have before you buy.
| Fitting | How it works | Notes |
|---|---|---|
| Snap-on | The foot clicks onto a shank holder when you press a lever | Common on home machines. Fast to change |
| Screw-on | The foot is held by a small screw on the shank | Common on industrial and older machines |
| Low shank | A shank 3/8 inch (9.5 mm) from the needle plate to the screw | Many domestic machines |
| High shank | A shank about 1 inch (25 mm) | Some older and some high-end machines |
| Slant shank | The shank is angled | Many older Singer-style machines |
| Special systems | Brand-specific holders | Some brands use their own fittings |
Always check the manual or the machine’s brand and model before ordering feet, since a foot that does not match the shank will not fit properly. Many third-party feet are made to suit common brands, but quality varies.
The most useful presser feet
1. All-purpose (zigzag) foot
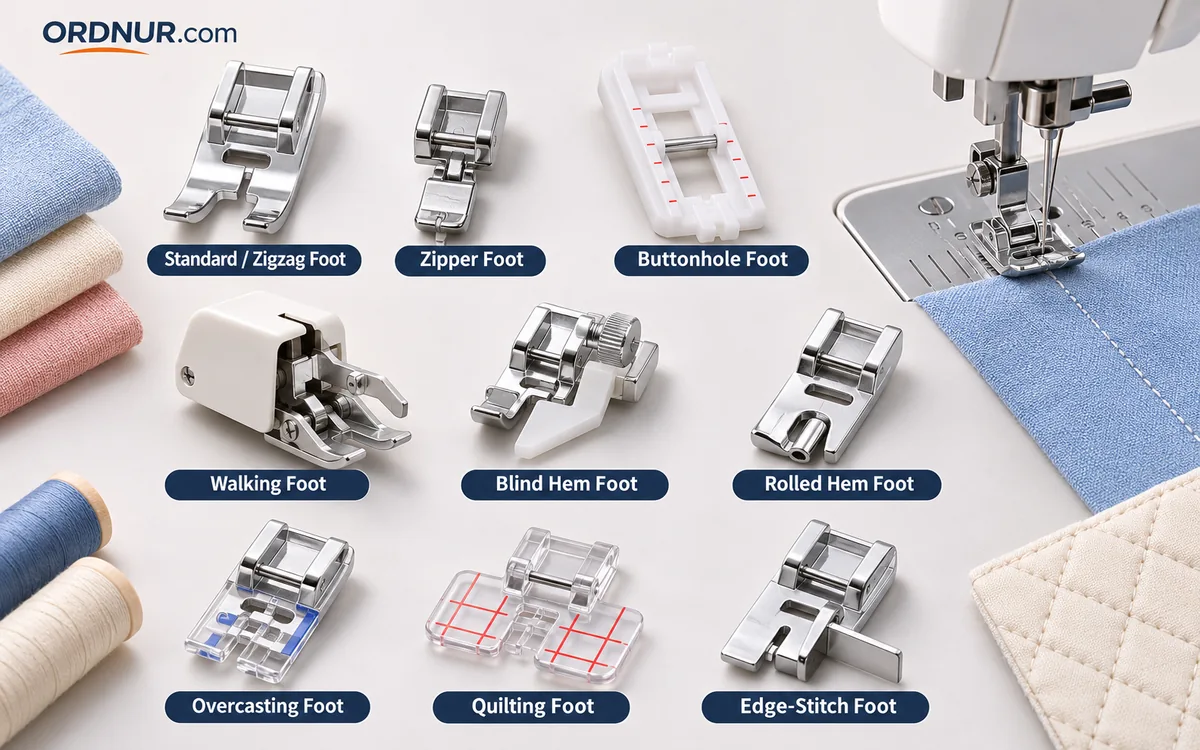
This is the standard foot that comes on the machine. It has a wide slot so the needle can swing for zigzag and other stitches. It is good for straight stitch, zigzag and most basic seams. If you own one foot only, this is it.
2. Straight stitch foot
It has a small round hole. The narrow opening holds light and slippery fabrics near the needle and stops them from being pulled down. Good for fine cottons, silks and lightweight knits. It only works with a centre needle position.
3. Zipper foot
A thin foot with the needle on one side, so you can stitch close to the zipper teeth. You can set it to the left or right of the needle. Used for standard zippers, piping and corded edges.
4. Invisible zipper foot
Has grooves that hold the zipper coil upright so the stitch lies right next to it. The result is a hidden zipper in dresses and skirts.
5. Buttonhole foot
Holds the button in a slide at the back. The machine reads the size and sews a matching buttonhole. Some are manual (four-step), others sensor-based or one-step.
6. Blind hem foot
Has a guide that keeps the folded edge in place while the needle catches a tiny part of the fold. The result is a hem with stitches that are almost invisible on the right side. Used for trousers, skirts, curtains.
7. Walking foot (even feed foot)
Has its own set of feed teeth that move the top layer along with the bottom layer, so both layers advance together. Prevents layers from creeping or puckering. A must for quilting, thick layers, knits, vinyl, leather and matching stripes or checks.
8. Rolled hem foot
Has a curl that folds the raw edge twice as you sew, and makes a very narrow hem, often 2 to 4 mm. Good for scarves, ruffles, lingerie and light fabrics.
9. Quarter-inch (patchwork) foot
Shows a precise 1/4 inch (6 mm) edge or guide for seam allowance. Quilters use it for piecing patches.
10. Free-motion (darning) foot
A spring-loaded foot that hovers just above the fabric. With the feed dogs lowered, you move the fabric by hand to draw lines, fill areas and quilt freehand.
11. Overlock or overcast foot
Has a small bar that holds the edge flat so zigzag or overcast stitches do not curl the fabric edge. Used to neaten raw edges on a household machine.
12. Teflon (non-stick) foot
Has a smooth underside that glides over sticky or coated materials such as leather, vinyl, PU and oilcloth, which would grab on a metal foot.
13. Roller foot
Has small rollers instead of a flat base. Moves easily over thick, sticky or slippery material like leather and faux fur.
14. Gathering foot
Pulls and gathers fabric as it sews. Used for ruffles and skirts. Some versions can attach a flat piece to a gathered piece in one pass.
15. Ruffler
A bigger attachment that makes pleats or gathers at set intervals. Used for curtain headings, flounces and costumes.
16. Piping or cording foot
Has grooves on the underside that guide piping cord so you can stitch close to it. It is used for cushion edges, upholstery and trims.
17. Edge-stitching (stitch-in-the-ditch) foot
Has a centre guide that rides along a seam, edge or fold, and keeps the needle at an exact distance. Used for topstitching and stitching in the ditch.
18. Binder foot
Feeds a bias binding strip around a raw edge and sews it in one pass. Used for quilts, aprons and garments.
19. Button sewing foot
Holds a flat button in place so the machine can zigzag across its holes to attach it.
20. Embroidery (open-toe) foot
Has a cutout in the front so you can see the stitching area. Good for satin stitch, appliqué and decorative stitches.
21. Hinged or compensating foot (industrial)
Two parts move up and down separately to cross thick seams, such as jeans side seams and hems, without the fabric stalling.
22. Folder or hemmer (industrial)
A metal attachment mounted in front of the foot that folds the edge of fabric into a hem or binds it. Used in garment factories for shirt hems, sleeve plackets, and waistbands. Related ideas are in our guide on shirt hem types and stitching.
Quick guide: which foot for which job
| Job | Best foot |
|---|---|
| Everyday straight and zigzag seams | All-purpose foot |
| Fine, slippery or sheer fabric | Straight stitch foot |
| Standard zipper | Zipper foot |
| Hidden zipper in a dress | Invisible zipper foot |
| Buttonholes | Buttonhole foot |
| Invisible hem | Blind hem foot |
| Knits, quilts and multi-layer work | Walking foot |
| Narrow hem on a scarf | Rolled hem foot |
| Patchwork seams | Quarter-inch foot |
| Freehand quilting or darning | Free-motion foot |
| Leather, vinyl, oilcloth | Teflon or roller foot |
| Ruffles and gathers | Gathering foot or ruffler |
| Piping on cushions | Piping or cording foot |
| Neat topstitching | Edge-stitch foot |
| Binding quilts or aprons | Binder foot |
| Thick jeans seams | Hinged (compensating) foot |
How to change a presser foot
- Turn off the machine, or at least stop the needle.
- Raise the needle to its highest position and lift the presser foot lever.
- For snap-on feet, press the small lever behind the shank. The foot drops off.
- Line up the new foot’s pin with the groove in the holder, and lower the lever until it clicks.
- For screw-on feet, loosen the screw with the small screwdriver, take off the foot, fit the new one and tighten the screw firmly.
- Turn the hand wheel by hand for one full turn, to make sure the needle goes through the hole without hitting the foot.
Hitting the foot with the needle can bend or break the needle, so always test by hand first.
Presser foot pressure
The pressure is how hard the foot pushes the fabric onto the feed dogs. Most machines have a dial or a screw to adjust it.
- Too much pressure squashes thick fabrics, leaves marks on delicate ones and stops them from moving easily.
- Too little pressure lets the fabric slip, causing uneven stitches and skipped stitches.
For thin, soft fabric use light pressure. For thick or heavy fabrics use higher pressure. Start with the setting in the manual and make small changes while testing on a scrap.
Worked example: how the right foot saves time
A garment factory hems 1,000 shirts a day. Each bottom hem is 1.6 metres around. A trained operator, using only a normal foot and folding by hand, takes 0.45 standard minutes (SAM) for the hem. With a hemmer attachment, the same operation takes 0.30 SAM.
- Time saved per shirt = 0.45 − 0.30 = 0.15 minute
- Time saved per 1,000 shirts = 0.15 × 1,000 = 150 minutes, or 2.5 hours
If an operator costs 150 currency units per hour (wages and overhead):
- Daily saving = 2.5 × 150 = 375 units
- Over 26 working days = 375 × 26 = 9,750 units a month
If the hemmer costs 3,000 units, it pays back in under one month for this single operation (3,000 ÷ 375 = 8 working days). The quality also improves, since the hem width stays even. This is why factories invest in folders and special feet for repeated tasks. See our article on productivity vs production for how saved minutes turn into output.
Choosing and buying presser feet
- Check your machine model and shank type before you buy.
- Buy the feet you will use. A basic set of all-purpose, zipper, buttonhole and blind hem feet covers most needs. Add a walking foot if you sew knits or quilts.
- Prefer metal bases for durability, except for plastic or Teflon types made for specific jobs.
- Original brand feet fit best. Good third-party feet can work, but test fit and the position of the needle hole.
- Store feet in a labelled box so they do not get lost or bent.
Common problems and fixes
| Problem | Likely cause | Fix |
|---|---|---|
| Needle hits the foot | Wrong foot for the stitch width or needle position | Use the right foot, reset the stitch width |
| Fabric does not move | Foot pressure too high, feed dogs lowered | Lower pressure, raise the feed dogs |
| Layers shift or pucker | Top layer drags | Use a walking foot |
| Skipped stitches on knits | Wrong needle or foot not holding fabric | Fit a ball point needle, check pressure. See needle selection |
| Leather or vinyl sticks | Metal foot grips surface | Use a Teflon or roller foot |
| Zipper stitching is wavy | Foot not set close to the teeth | Move the zipper foot to the right side and guide the fabric |
| Foot will not clip on | Wrong shank type or dirt | Check shank, clean the holder |
| Foot marks on delicate fabric | Pressure too high | Lower pressure, use tissue paper under the foot |
| Fabric bunches under the foot | Thread not in the take-up lever, wrong tension | Rethread, check upper tension |
Care of presser feet
- Wipe off lint and thread with a soft brush after each project.
- Check for burrs or scratches on the underside. A rough foot damages fabric.
- Do not drop or bend feet.
- Replace a foot that is worn, cracked or loose.
- Keep feet away from damp places, to prevent rust.
For wider machine maintenance, see our sewing machine maintenance schedule.
Final thoughts
The presser foot for sewing machine work is a small part that has a big effect. Start with the all-purpose, zipper, buttonhole and blind hem feet. Add a walking foot when you start working with knits and layers. Match every foot to your machine, keep them clean and change them with care. In a factory, the right folder or foot can cut minutes from every garment. At home, it can make your seams neater and your work easier.
Frequently asked questions
It is the part that holds the fabric against the feed dogs while the needle sews. It keeps the fabric flat and moving, and special feet help with particular jobs.
A walking foot is the best choice for knits, since it moves the top and bottom layers together and reduces stretching.
A zipper foot stitches close to a standard zipper. An invisible zipper foot has grooves that hold the zipper coil open so you can sew a hidden zipper.
No. The foot must match your machine’s shank type, such as snap-on, low shank or high shank, and the stitch width.
The pressure may be too high, the feed dogs may be lowered or the thread may be caught under the plate.
It has its own feed teeth that pull the top layer along, so multiple layers move at the same speed and do not pucker.
A Teflon foot or a roller foot, since they glide over the surface and do not stick.