A sketch shows how a garment looks. It does not show how to build it. Between the idea on paper and the finished dress is a flat set of shapes that, once sewn, curve around a moving body. Those shapes are the pattern. Pattern making in fashion designing is the craft of turning a design idea into paper or digital pieces that cut, sew and fit well.
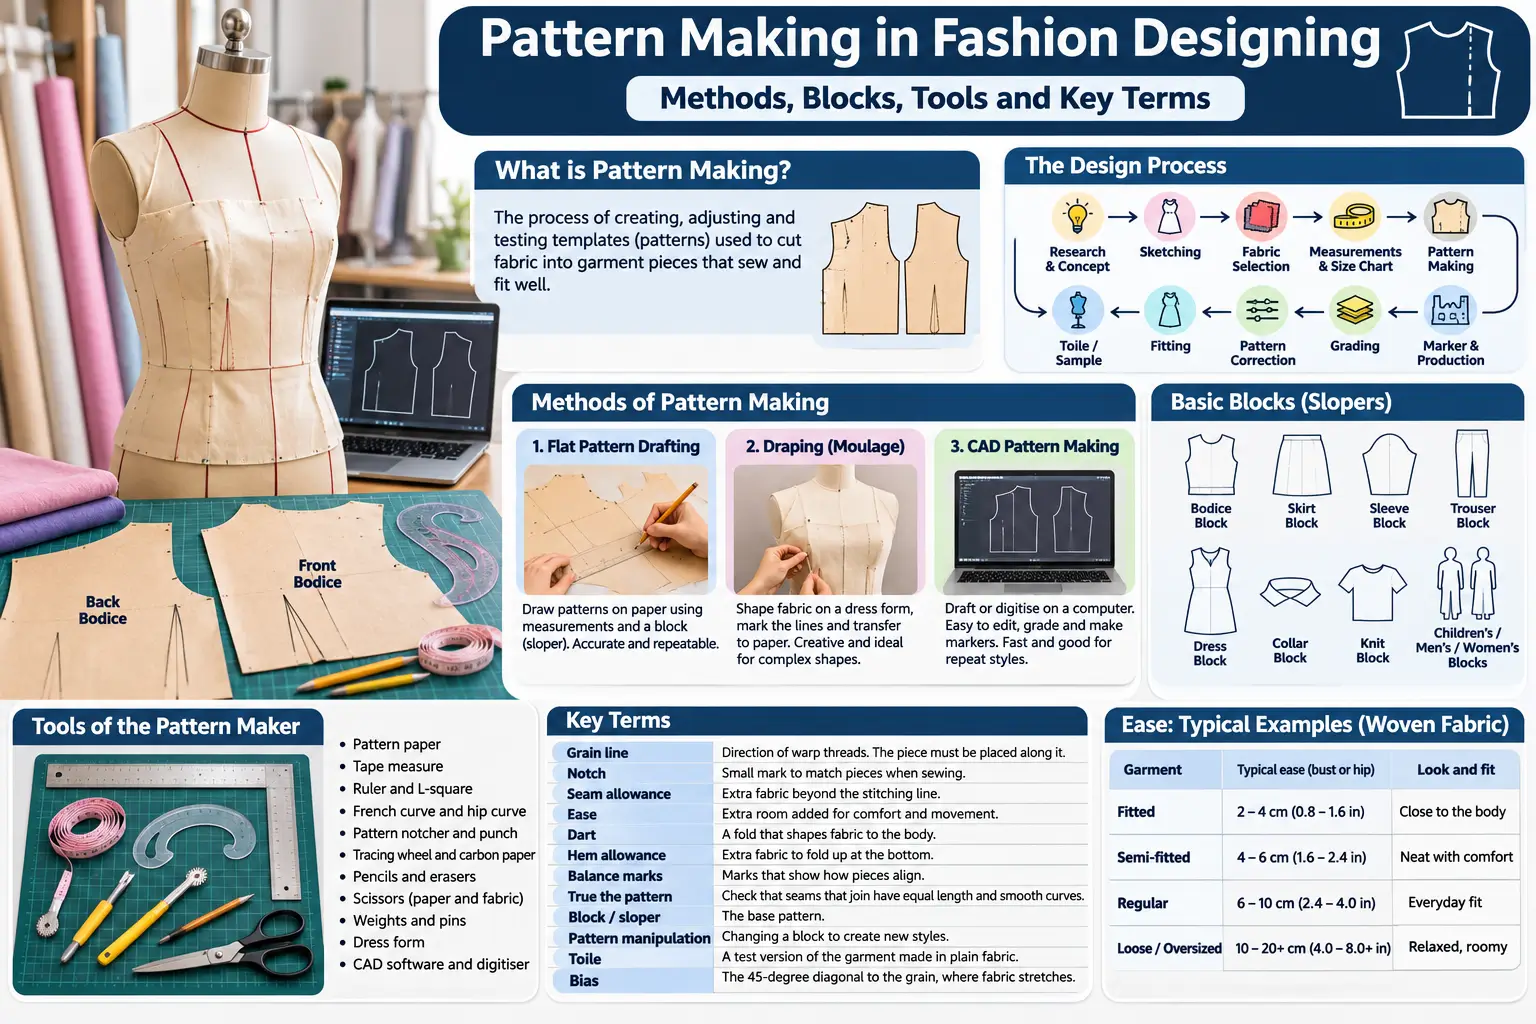
This guide explains pattern making from the designer’s point of view. You will see where it sits in the design process, the three main methods, the basic blocks, the tools and the terms. A worked example drafts a simple skirt block with real measurements. It also lists common fit problems and how to avoid them. For a factory-side view, see our guide on pattern making in garments.
What is pattern making
A pattern is a template used to cut fabric into the pieces of a garment. Pattern making is the process of creating, adjusting and testing those templates. A pattern gives the shape of each piece, the position of darts, notches and grain lines, the seam allowance and the instructions for assembly.
A good pattern has three qualities. It fits the intended body, it matches the design and it can be made efficiently in fabric. A poor pattern shows up as strain lines, gaping, twisting, tight spots and wasted cloth.
Where pattern making sits in the design process
- Research and concept. The designer collects ideas, trends and the needs of the customer.
- Sketching. Design drawings and flat technical sketches show the style.
- Fabric and trim selection. The fabric choice changes the pattern. A stretch knit and a stiff woven need different patterns for the same style.
- Measurements and size chart. Body measurements and garment measurements are decided. See our guide on measurement of top and bottom garments.
- Pattern making. The first pattern is made from a block.
- Toile or sample. A first sample is cut in test fabric (muslin or calico) and sewn.
- Fitting. The sample is tried on a model or dress form. Changes are marked.
- Pattern correction. The pattern is adjusted and a second sample is made if needed.
- Grading. The approved pattern is scaled to other sizes. See our guide on pattern grading.
- Marker making and production. The pattern goes to the factory with a tech pack. See the tech pack for clothing.
Methods of pattern making
1. Flat pattern drafting
The pattern maker draws the pattern on paper using measurements and formulas. First a basic block (sloper) is drafted. The block is a simple, close-fitting pattern with no style details. Style lines, pockets, collars and darts are then added or moved on the block. This is the most common method in schools and factories. It is accurate and repeatable.
2. Draping (moulage)
The designer pins and shapes fabric directly on a dress form or body, then marks the shapes and transfers them to paper. Draping is ideal for gowns, drapes, cowls and complex shapes where you want to see how the fabric falls. It is slower but creative, and it deals well with fabric behaviour.
3. Computer-aided pattern making (CAD)
Patterns are drafted or digitised on a computer, using pattern software. Pieces can be corrected, graded, nested into markers and sent to a plotter or an automatic cutter. CAD saves time on repeat styles and sizes, and keeps a digital library. It still needs a pattern maker who understands fit.
| Method | Strength | Limit | Best for |
|---|---|---|---|
| Flat drafting | Accurate, repeatable, low cost | Needs maths and practice | Most everyday garments |
| Draping | Shows fabric behaviour and shape | Slower, needs a dress form | Gowns, bias cuts, fine fabric |
| CAD | Fast edits, grading and marker making | Software cost and training | Factories, repeat styles |
Many designers mix the methods. They drape to explore a shape, flatten it into a paper pattern, then digitise it for grading.
Basic blocks (slopers)
A block is the base for most patterns. Common blocks include:
- Bodice block: front and back for the upper body
- Skirt block: front and back with darts
- Sleeve block: fitted sleeve with cap
- Trouser block: front and back with crotch curve
- Dress block: bodice and skirt combined
- Collar block: for shirts and jackets
- Knit block: for stretch fabric, with negative ease
- Children’s, men’s and women’s blocks: different proportions for each group
Brands keep their own blocks, built for their customers’ fit. A well-kept block saves hours of work and keeps the fit consistent across styles. See also our guide on types of darts for how shaping is built into blocks.
Tools of the pattern maker
| Tool | Use |
|---|---|
| Pattern paper (plain, dotted or squared) | Drafting surface |
| Tape measure | Body and pattern measurements |
| Ruler and L-square | Straight lines and right angles |
| French curve and hip curve | Armholes, necklines, hip lines |
| Pattern notcher and punch | Notches and drill holes |
| Tracing wheel and carbon paper | Transferring marks |
| Pencils and erasers | Drawing |
| Scissors (paper and fabric, kept separate) | Cutting |
| Weights and pins | Holding pieces |
| Dress form | Draping and checking fit |
| Pattern hooks or hangers | Storing patterns |
| CAD software and digitiser | Digital patterns |
Key terms every designer should know
| Term | Meaning |
|---|---|
| Grain line | An arrow showing the direction of the warp threads. The piece must be placed along it |
| Notch | A small mark on the edge to match pieces when sewing |
| Seam allowance | Extra fabric beyond the stitching line |
| Ease | Extra room added to body measurements for comfort and movement |
| Dart | A fold that shapes fabric to the body. See types of darts |
| Hem allowance | Extra fabric to fold up at the bottom |
| Balance marks | Marks that show how pieces align |
| Fold line | Pattern edge placed on a fold of fabric |
| True the pattern | Check that seams that join have equal length and smooth curves |
| Block or sloper | The base pattern |
| Pattern manipulation | Changing a block to create new styles |
| Toile | A test version of the garment made in plain fabric |
| Bias | The 45-degree diagonal to the grain, where fabric stretches |
Ease: the small number that decides the fit
Ease is the difference between the body measurement and the garment measurement. Without ease, a woven garment would be too tight to move in.
| Garment | Typical ease at the bust or hip (woven fabric) |
|---|---|
| Fitted dress or blouse | About 4 to 8 cm |
| Standard shirt | About 8 to 12 cm |
| Loose shirt or jacket | About 12 to 20 cm or more |
| Fitted skirt at the hip | About 2 to 6 cm |
| Knit top | Often zero or negative, since the fabric stretches |
These are common ranges, not rules. Each brand sets its own fit. A designer adjusts ease for the style and the fabric.
Worked example: drafting a basic skirt block
Let us build the key widths for a straight skirt with simple numbers.
Measurements
- Waist: 72 cm
- Hip: 96 cm
- Hip depth (waist to the fullest part of the hip): 20 cm
- Skirt length: 58 cm
- Ease: 4 cm at the hip in total, 2 cm at the waist in total
Step 1: hip width of one quarter panel
A basic skirt has four panels (two front halves and two back halves, or a front fold and a back fold). Work with one quarter.
- Hip with ease = 96 + 4 = 100 cm
- Quarter hip = 100 ÷ 4 = 25 cm
Step 2: waist width of one quarter panel
- Waist with ease = 72 + 2 = 74 cm
- Quarter waist = 74 ÷ 4 = 18.5 cm
Step 3: the shaping amount
- Difference = 25 − 18.5 = 6.5 cm per quarter panel
Step 4: share the shaping
- Side seam shaping: 1.5 cm
- Darts: 6.5 − 1.5 = 5.0 cm in total per quarter panel
- Use two darts of 2.5 cm each per quarter panel, with the front ones shorter than the back ones.
Step 5: dart lengths
- Front darts: about 9 to 10 cm long
- Back darts: about 12 to 14 cm long
Step 6: add allowances
- Seam allowance: 1.5 cm on the side seams and the waist, 2 cm at the centre back seam for the zip
- Hem allowance: 4 cm
Step 7: rough fabric estimate
For a plain fabric 150 cm wide:
- The front piece is two quarter panels, so about 2 × 25 = 50 cm wide at the hip, or about 53 cm with seam allowances. The back piece is the same. Together they take about 106 cm of the 150 cm width, so both fit side by side.
- Length used = 58 + 4 (hem) + 1.5 (waist seam) = 63.5 cm
- A waistband strip about 78 cm long and 7 cm wide fits in the leftover width beside the panels
- With a margin for matching and shrinkage, plan about 0.7 m, then confirm it on the real marker
A draft in the real world is then tested in a toile and corrected after fitting. Rules of thumb are only a starting point.
Common fit problems and pattern fixes
| Problem | What you see | Likely pattern fix |
|---|---|---|
| Skirt rides up at the front | Pulling folds across the lap | Add length at the centre front or check hip curve |
| Skirt twists | Side seam moves forward or back | Check grain line and balance of front and back |
| Gaping at the waistband | Space at the back waist | Increase dart intake or reduce waist measurement |
| Drag lines from the hip to the waist | Diagonal wrinkles | Add ease or move darts |
| Neckline gaping | Front neck stands away | Shorten the neckline edge or add a small dart |
| Armhole tight | Pulling at the underarm | Lower the armhole or add ease |
| Sleeve twists | Sleeve hangs forward or back | Check the sleeve cap balance marks |
| Shoulder seam slides forward | Seam not on top of the shoulder | Move the seam back by a small amount |
| Trousers wrinkle at the crotch | Folds at the inseam | Adjust the crotch depth or curve |
| Garment shrinks after wash | Smaller size | Allow for fabric shrinkage. See pattern making based on fabric shrinkage |
Pattern making for knit and woven
Woven fabric does not stretch much, so the pattern relies on ease, darts and seams for fit. Knit fabric stretches, so the pattern is often smaller than the body, using negative ease. A knit pattern also needs checks on the direction of stretch and the recovery of the fabric. See our comparison of woven and knit fabric for the structural difference.
Pattern making in the factory
In a factory, the pattern maker works with a tech pack from the buyer. The pattern must match the measurement chart, including tolerances. After approval, patterns are graded and nested into markers for cutting. Good record-keeping matters. Each pattern piece needs a name, style number, size, grain line, number of pieces to cut and fabric type. The cutting department uses these details to plan markers and fabric use.
Tips for beginners
- Learn to take accurate body measurements. Wrong numbers ruin a pattern.
- Start with a skirt block, then move to a bodice and trousers.
- Keep the block clean, labelled and safe. Work on copies.
- Always make a toile before cutting good fabric.
- Fit on a real body when possible, not only on a dress form.
- Check that matching seams have equal length before you cut.
- Mark grain lines and notches on every piece.
- Write down changes made after each fitting.
- Learn to grade, so one good pattern can serve many sizes.
- Study garments you own. Turn them inside out and see how the pieces are shaped.
Final thoughts
Pattern making in fashion designing is where design meets the body. Learn the methods, build a clean set of blocks, understand ease and darts and always test with a toile. Keep notes and measure carefully. With each pattern you make and correct, your eye and your hands will improve, and your designs will fit as well as they look on paper.
Frequently asked questions
It is the process of creating the flat templates used to cut and sew a garment, based on a design and body measurements.
The main methods are flat pattern drafting, draping on a dress form and computer-aided design (CAD).
A basic, fitted pattern without style details. Designers use it as a base to create new styles.
Drafting uses measurements and drawing on paper. Draping shapes fabric directly on a form and then converts it to a pattern.
It is the extra room added beyond body measurements so the garment is comfortable and allows movement.
A toile is a test garment in cheap fabric. It shows fit problems before you cut the real fabric.
Yes. Start with simple blocks, an accurate tape measure, pattern paper and patience. A class or a mentor helps with fitting.