A collar frames the face. It is the first thing a person sees on a shirt, and one of the first places an inspector looks. A crooked tip, a curled edge or a bubbling surface shows up straight away. That is why collars are among the hardest parts of a shirt to sew well.
In this guide, we go through the parts of a collar one by one. You will learn the names that pattern makers and sewing teams use, what each part does and where faults come from. If you want a view of the full shirt, our guide on the different parts of a shirt shows where the collar sits in the garment.
What a collar does
A collar is the part of a garment that surrounds the neck. It can be folded, standing or flat. On a shirt, it covers the neck seam and gives the shirt its character. On a jacket, it frames the lapel. On a polo, it adds a smart finish to a knitted body.
Collars serve three jobs. They finish the neckline neatly. They shape how the garment looks around the face. They also hold a tie or protect the neck from sun and wind.
Parts of a collar at a glance
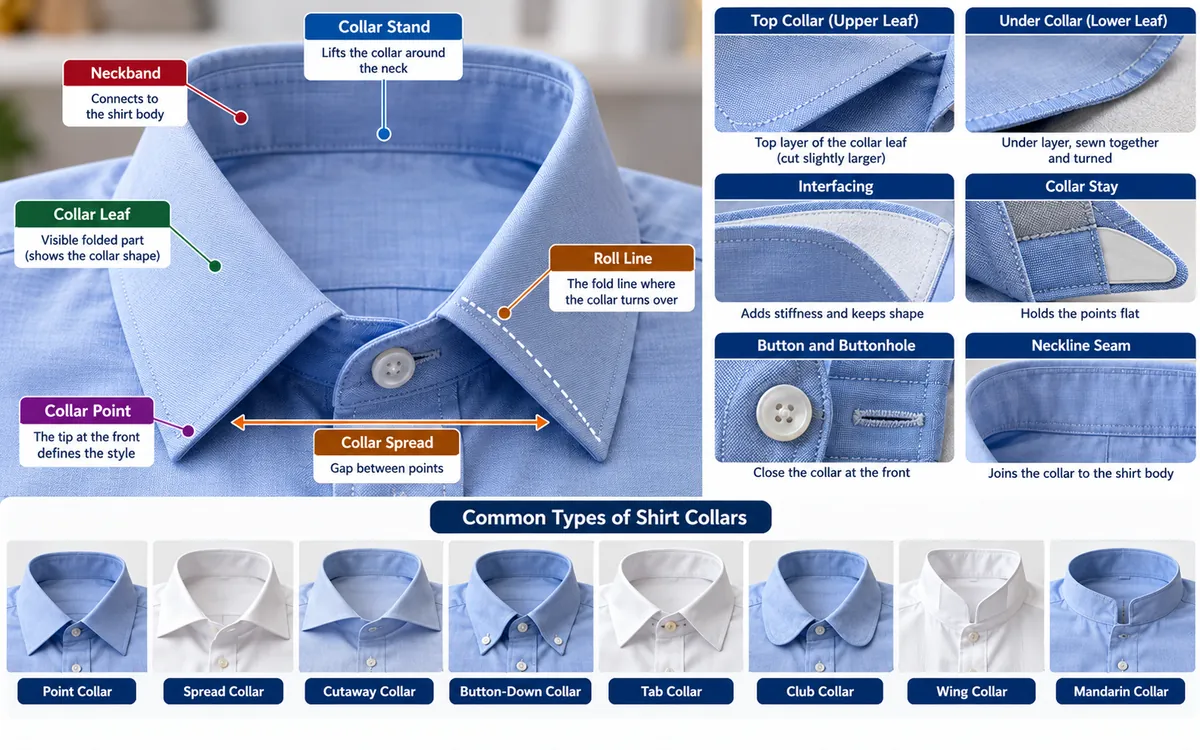
| Part | Location | Job |
|---|---|---|
| Collar leaf | The visible folded part | Shows the collar shape |
| Collar stand | The band below the leaf | Lifts the collar around the neck |
| Collar points | The tips at the front | Define the collar style |
| Collar spread | The gap between points | Sets the width at the front |
| Roll line | The fold line | Where the leaf turns over |
| Neckband | The base of the collar | Connects to the shirt body |
| Interfacing | Between layers | Adds stiffness |
| Collar stays | Pockets in the points | Hold the points flat |
| Button and buttonhole | Neckband front | Close the collar |
The collar leaf
The collar leaf is the part you see when the collar is folded down. Some people call it the fall. It is made of two layers of fabric. The upper layer is the top collar and the lower layer is the under collar. They are sewn together on three sides, turned inside out and pressed flat.
The top collar is cut slightly larger than the under collar. This extra size lets the edge roll under slightly, so that the seam does not show on the outside. The effect is called turn of cloth. If the two layers are cut the same size, the collar curls upward at the edges.
The collar stand
The collar stand is the narrow band that sits between the neck and the leaf. It stands up around your neck. On a button-up shirt, it is clearly visible when the top button is closed. The stand also makes the leaf sit properly at an angle.
A taller stand lifts the collar higher and shows more of the tie knot. A short stand gives a more relaxed shape. A typical shirt collar stand is somewhere between 2.5 and 4 cm high, though styles vary. Most pattern makers choose the height to match the style of the shirt.
In a one-piece collar, also called a camp collar, the leaf and stand are cut together as a single piece. There is no separate band. The collar rolls open smoothly and looks relaxed. A two-piece collar has a separate stand and leaf and gives a crisper line.
The collar points
The points are the tips of the collar at the front. They define the style. Common types include:
- Point collar: Medium length points with a narrow gap between them. A classic office collar.
- Spread collar: Points that angle outward with a wider gap. Good for large tie knots.
- Cutaway collar: An extreme spread collar with points that sweep far back.
- Button-down collar: Points are held to the shirt body with small buttons.
- Tab collar: A small tab links the two points beneath the tie.
- Club collar: Rounded points.
- Wing collar: Stiff, upright points that fold down for formal wear.
- Mandarin or band collar: No fold, just a stand.
You can find a visual guide to these in our article on different styles of shirt collar.
The collar spread
The spread is the distance between the points. It is measured at the end of the collar, along the straight line from one tip to the other. A wide spread suits a thick tie knot like a Windsor. A narrow spread suits a thin tie and a smaller knot. The spread also changes how a collar suits the face. Wide spreads look bold. Narrow ones look sharp.
The neckband
The neckband is the base of the collar that wraps around the neck. In a two-piece collar, the stand is part of the neckband. It is sewn to the shirt body along the neckline. The ends of the neckband carry the button and buttonhole.
The neckband must match the measured neck size of the shirt. The collar size, which is how shirts are sold, is the length of the neckband when it is buttoned. A 15.5 shirt has a neckband of about 15.5 inches, measured from the center of the button to the end of the buttonhole.
The roll line
The roll line is the fold at the top of the stand, where the leaf bends over. A good collar rolls softly along this line and sits tight at the neck. A poorly made collar shows a hard crease or twists to one side.
Pattern makers add a small curve to the roll line so that the leaf curves around the neck. This curve is called the collar break or spring. It makes the collar sit snugly.
Interfacing
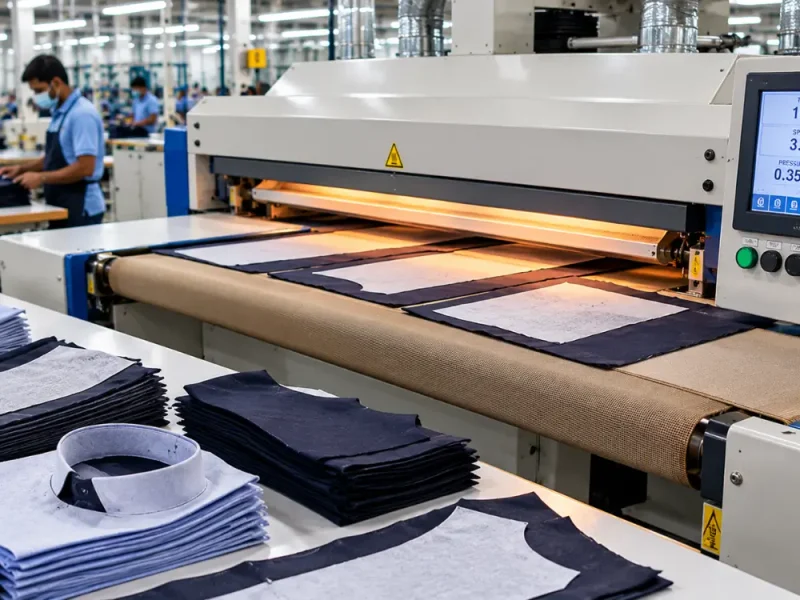
Interfacing is a thin layer of stiff fabric placed between the top and under collar. It keeps the collar firm and stops it from collapsing. Most shirt collars use fusible interfacing. This is a sheet with heat-activated glue on one side. It is pressed onto the back of the fabric with a fusing machine.
The weight of the interfacing matters. A very stiff one makes the collar rigid and hard. A light one makes it soft. Casual shirts often use light interfacing. Formal shirts use firmer interfacing.
Poor fusing causes bubbles and wrinkles on the surface. The cause is usually wrong temperature, time or pressure. Our guide on the fusing process and quality inspection explains how to prevent this.
Collar stays
Collar stays are thin strips, made from plastic, metal or bone, that slip into small pockets on the underside of the collar points. They keep the points flat and straight. Many dress shirts include them. Without stays, the points can curl up, especially with heavy use.
Cheaper shirts have sewn-in stays that cannot be removed. Better shirts use removable stays, so they can be taken out before washing.
The top button of the neckband closes the shirt at the neck. A second button sits slightly below or on the leaf in button-down collars. The buttonhole is sewn into the other side of the neckband. A sturdy buttonhole stops the collar from gaping.
In a polo shirt, the collar often has a placket with two or three buttons below the collar. The collar itself is usually a knitted strip, called a rib collar or a flat knit collar. For polo structure see our guide to the different parts of a polo shirt.
Collar types for other garments
Collars appear on many garments, not just shirts.
- Peter Pan collar: A flat, rounded collar, common on blouses and dresses.
- Sailor collar: A large square collar that falls over the shoulders and back.
- Shawl collar: A smooth, continuous collar that curves around the neck, used on cardigans and robes.
- Notch collar: A collar with a small notch where it meets the lapel, used on jackets and blazers.
- Funnel collar: A tube-shaped collar that stands up, used on jackets and sweaters.
- Turtleneck: A tall tube that folds over.
- Hood: A hood replaces the collar on casual jackets.
Our guides on the parts of a jacket and parts of a sweater cover collars on those garments in more detail.
How a collar is made
Making a collar takes several steps. It is often done in a separate small-parts section before the collar goes to the shirt body.
- Cutting: Top collar, under collar, stand and interfacing are cut.
- Fusing: Interfacing is bonded to the back of the pieces.
- Marking: Seam lines and points are marked.
- Collar run: The top and under collar are sewn together along three edges.
- Trimming and turning: The seam allowance is trimmed at the points. The collar is turned right side out.
- Pressing: The collar is pressed with steam to set the shape.
- Top stitching: A line of stitching is sewn near the edge to hold the layers.
- Collar attach: The collar is joined to the neckband and shirt body.
The collar run is the step that needs the most skill. Operators sew along a marked line, and the points must turn out sharp, with no bulk.
Common faults
- Curled collar tips: The under collar is too big, or the fusing was uneven.
- Uneven collar points: One point is longer than the other.
- Bubbling: The glue on the interfacing did not bond properly.
- Gap at the neck: The neckband is too loose or the buttonhole is poorly placed.
- Twisted collar: The pieces were cut off grain.
- Wavy topstitching: The stitch tension or the fabric feeding was uneven.
- Visible seam: Turn of cloth was not allowed, so the seam shows from the top.
- Shade difference: The collar and body come from different fabric lots.
For the broader picture of sewing problems and how teams fix them, read our guide on sewing defects and root causes.
How to check a collar
- Look at the points. They should be sharp, symmetrical and flat.
- Run your finger along the edge. It should feel smooth with no ridge.
- Feel the interfacing. It should be firm but not stiff like cardboard.
- Close the top button. The collar should sit close to the neck with no gap.
- Check the stitching. The topstitching should be about 2 to 3 mm from the edge and even.
- Wash it. A good collar stays flat after washing.
Final thoughts
A collar is a small part with a big effect. The leaf shows the style, the stand lifts it, the points set the shape, the interfacing gives it body and the neckband fits it to you. Know those five parts and you can judge any collar in seconds. When you check one, look at the points, the roll line and the topstitching first. If they are clean and even, the rest will usually be good as well.
Frequently asked questions
The main parts are the collar leaf, collar stand, points, neckband, roll line and interfacing. Many dress shirts also have collar stays.
The collar stand is the narrow band that sits between the neck and the visible folded part. It lifts the collar and helps it sit properly.
The leaf is the visible folded part. The stand is the band beneath it that stands against the neck.
Collar stays are thin strips that slide into pockets under the collar points. They keep the points flat and straight.
The spread is the distance between the collar points. A wide spread suits a thick tie knot and a narrow spread suits a thin knot.
Curling usually comes from a poorly cut under collar, uneven interfacing or lack of collar stays. Washing and ironing too hot can also make it worse.
Collar size is the length of the neckband, measured from the center of the button to the end of the buttonhole. A size 15.5 collar is about 15.5 inches.