A button is the smallest part on most garments, yet it is the one people notice when it falls off. A missing button can make a good shirt unusable. Whether you sew your own clothes, buy trims for a factory or just want to fix a coat, it helps to know the parts of a button and what each one does.
This guide explains the parts of a button, the main types, how buttons are measured and how they are attached. It also covers the faults that inspectors check. For a wider look at buttons in clothing, our guide on different types of buttons for clothes gives style examples.
A button is a small disc or knob that passes through a loop or buttonhole to fasten two edges of a garment. It is simple but clever. The button is held by thread on one side and by the buttonhole on the other. Pulling the two sides apart puts the force on the thread, so thread strength and sewing quality matter as much as the button itself.
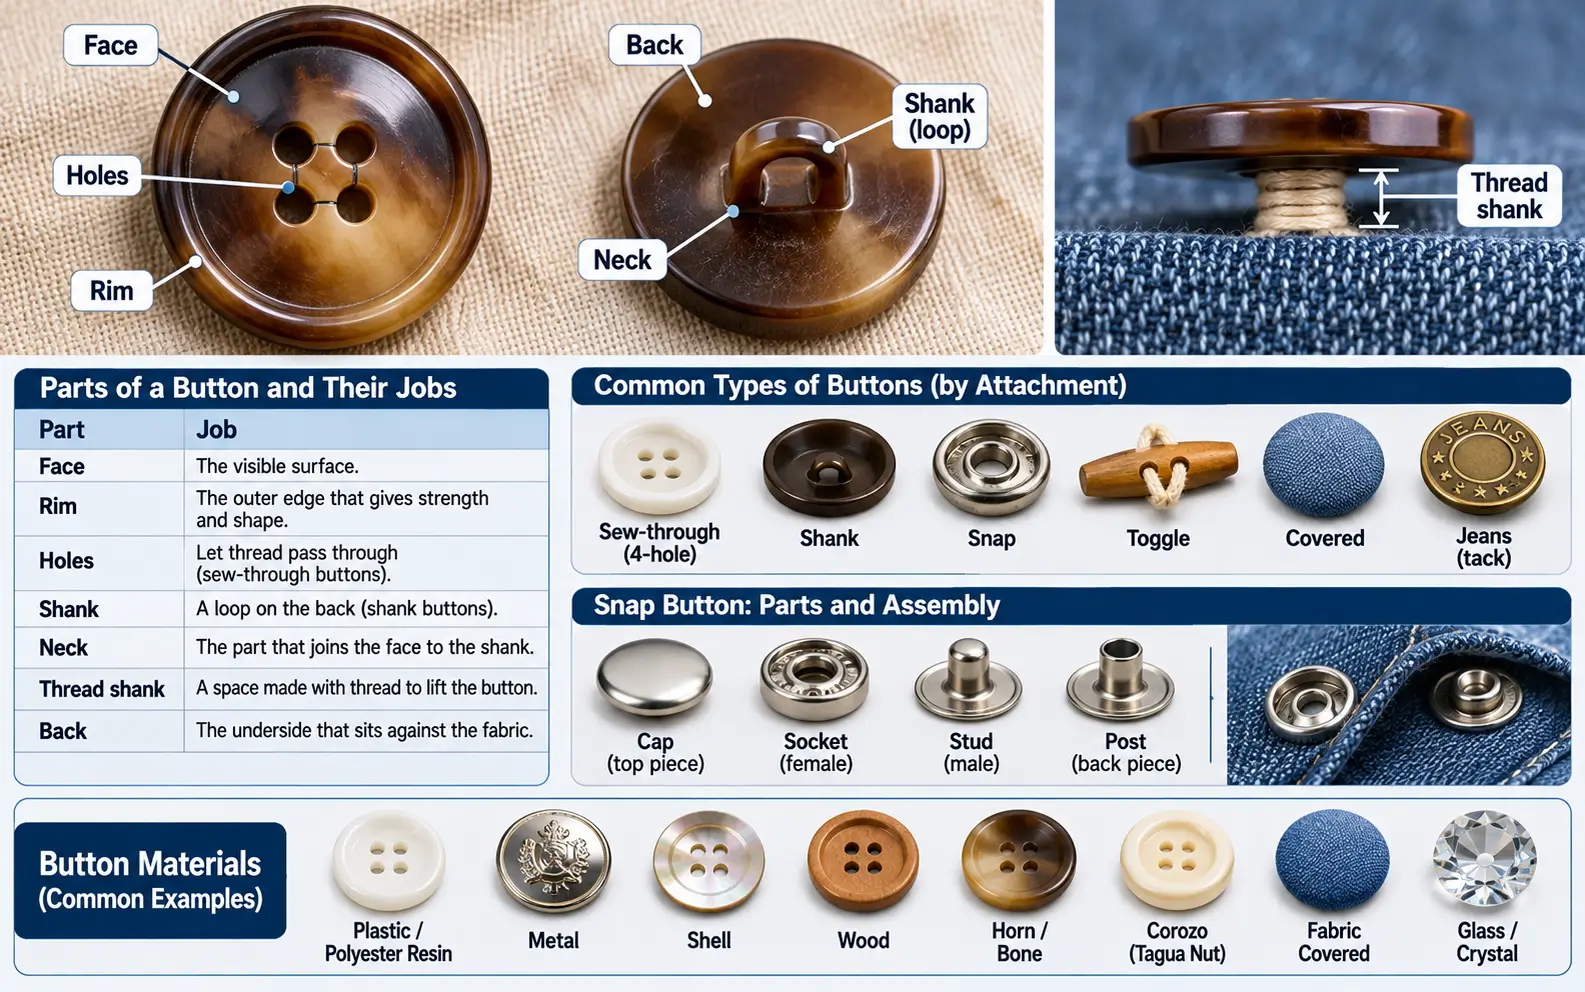
| Part | Location | Job |
|---|---|---|
| Face | Top | The visible surface |
| Rim | Outer edge | Raised border that frames the face |
| Holes | Center | Let thread pass through (sew-through buttons) |
| Shank | Back | Loop that holds the button above the fabric |
| Back | Underside | Sits against the fabric |
| Thread | Stitching | Holds the button to the garment |
| Thread shank | Under the button | Space made with thread to lift the button |
| Neck | Under the face | Part of a shank button that joins the face to the shank |
The face
The face is the top of the button. It is the part you see and touch. The face can be flat, domed, concave, textured or printed. Some buttons carry a logo, a pattern or a shiny coating. The face is where color, finish and design show.
Plastic buttons are often molded with a design on the face. Metal buttons may be stamped or engraved. Shell buttons have a natural shine. Wood buttons show grain.
The rim
The rim is the raised or rounded border around the edge. It gives the button strength and helps it keep its shape. A thick rim protects the face. A thin rim gives a flatter, more delicate look. Some buttons have a rim that curves slightly inward. This helps the button slide into a buttonhole without catching.
The holes
Sew-through buttons have holes in the center. Thread passes through these holes to attach the button. There are two main layouts.
- Two-hole button: Common on shirts and light garments.
- Four-hole button: Common on shirts, coats and jackets. The thread can be sewn in a cross, a square or two parallel lines.
The holes are drilled or molded. A smooth edge inside the hole matters, because a sharp edge can cut the thread and cause the button to fall off. Good buttons have holes with rounded edges.
The shank
A shank button has a loop or stem on the back instead of holes. Thread passes through the loop to attach the button. The shank lifts the button away from the fabric, so thick fabric can fold under it. This matters on coats and jackets.
There are two kinds of shank.
- Integral shank: The loop is part of the button, molded or cast as one piece. This is common on metal and plastic buttons.
- Attached shank: A separate loop made of metal or plastic is fitted to the button. This is common on fabric-covered buttons.
A shank has a neck, which is the part that connects the loop to the face. A long neck suits thick fabric. A short neck suits thin fabric.
The thread shank
If a sew-through button sits too close to a thick fabric, the fabric is pulled tight and the button cannot fasten smoothly. To fix this, the sewing person leaves a bit of extra thread between the button and the fabric. After sewing, the thread is wound around this space. This is called a thread shank. It acts like a small stem and gives the button room to move.
The length of the thread shank should match the fabric thickness. For a thin shirt it may be almost nothing. For a coat it may be 3 to 4 mm. A button with no thread shank on thick fabric looks tight and may break loose.
The back
The back is the underside of the button, the part that sits against the fabric. Flat backs sit flush. Shank backs have a loop. Some backs have a little spacer to protect the fabric from wear.
Button types
Buttons are grouped by how they attach and by their material.
By attachment
- Sew-through buttons: Have two or four holes. They are the most common type.
- Shank buttons: Have a loop on the back.
- Snap buttons: Press together. See below.
- Toggle buttons: Long, with a loop. Common on duffle coats.
- Covered buttons: A metal shell wrapped with fabric.
- Stud and tack buttons: Pushed through the fabric and fixed with a back piece. Common on jeans.
A snap button has four pieces. Two sit on one side of the garment and two on the other. The pieces are the cap, the socket, the stud and the post. They are fixed with a snap press. When you press the two halves together, they hold. Snaps need correct setting pressure. If the pressure is too low, the snap falls off. If it is too high, the snap breaks. See our guide on snap button pinch setting for details.
A jeans button is a metal tack button, fixed through the waistband with a post and a cap. It is made to withstand a lot of pulling and washing.
By material
- Plastic and polyester resin: Cheap, colorful and common. Polyester resin buttons look like shell or horn.
- Metal: Strong and shiny. Used on blazers, jeans and coats.
- Shell: Made from the inner layer of sea shells. Has a natural sheen. Used on dress shirts.
- Wood: Natural and warm. Used on casual clothing.
- Horn and bone: Natural material, used on coats and suits.
- Corozo (tagua nut): A hard nut that looks like ivory. A natural plastic substitute.
- Fabric covered: Used on dresses and upholstery.
- Glass and crystal: Used on special occasion wear.
Button sizes
Buttons are measured by diameter. In the garment industry, the most common unit is the ligne, pronounced “line.” One ligne equals 1/40 of an inch, or about 0.635 mm. So a 24 ligne button measures 24 x 0.635, around 15 mm across.
| Ligne | Approx. diameter (mm) | Typical use |
|---|---|---|
| 14 | 9 | Shirt collar, cuff |
| 16 | 10 | Shirt front |
| 18 | 11 to 12 | Shirt, blouse |
| 20 | 12.5 | Shirt, light jacket |
| 24 | 15 | Jacket sleeve, light coat |
| 32 | 20 | Blazer front, coat |
| 40 | 25 | Coat |
| 44 | 28 | Heavy coat |
Treat the table as a guide. Different buyers may use their own standards. Always confirm the size on the tech pack.
Buttonholes
A button needs a buttonhole to work. The buttonhole is a reinforced slit that the button passes through. Buttonholes are usually made on a special machine that cuts and stitches the slit in one step.
Common buttonhole types include:
- Straight buttonhole: A simple slit with bar tacks at both ends. Used on shirts and blouses.
- Keyhole buttonhole: A slit with a round end for shank buttons. Used on jackets and coats.
- Eyelet buttonhole: A round hole for a shank to pass through. Used on thick fabrics.
- Bound buttonhole: Edges are covered with fabric strips. Used on tailored coats.
Our guide on buttonhole and bartack attaching machines shows how these are sewn in a factory.
The length of a buttonhole should be slightly more than the button diameter, plus the button thickness. A rough rule is the diameter plus 3 mm for flat buttons. A thick button needs more.
In a factory, buttons are attached using a button-sewing machine. The machine holds the button in a clamp, then sews a set number of stitches through the holes. The stitch pattern, number of stitches and thread tension can be set on the machine. Common patterns are two-hole parallel, four-hole cross and four-hole square.
A typical shirt button gets around 12 to 16 stitches, though this varies by buyer and button type. For coat buttons, more stitches may be used. After sewing, the machine makes a few wrap stitches at the back to lock the thread. On a shank, the thread passes through the loop.
Hand sewing follows the same idea. A needle and thread passes through each hole several times. A thread shank is wound and knotted at the back.
Common faults
- Loose button: Too few stitches or weak thread.
- Button falls off: The thread was cut by a sharp hole edge, or the lock stitch is missing.
- Crooked button: The button is not aligned with the buttonhole.
- Wrong size: The button is too large or small for the buttonhole.
- Color mismatch: The thread or button color does not match the sample.
- Cracked button: Damage from pressing or laundering.
- Rusting: Metal buttons without proper plating rust after washing.
- Missing button: Not attached in the packing stage.
- Button pulled through fabric: The fabric is torn at the stitch point because there was no reinforcement.
Inspectors also run a pull test to check strength. A common test pulls the button with a set force and checks that it holds. The correct force depends on the buyer and the garment type, so always read the buyer’s requirement. Our guide to the button pull test SOP explains the method.
For wider checks on small parts, see our guide to trims and accessories inspection.
If a button comes off, replace it as soon as you can. A missing button puts extra strain on the others. Take the spare button from the inside of the garment if there is one. If not, match the size, number of holes and thickness. Sew with strong thread, make a small thread shank on thick fabric and finish with a few tight wraps and a knot at the back. For factory orders, buyers often ask for one or two spare buttons in a small bag sewn to the care label, so this is worth checking at packing.
- Match the weight. Heavy fabric needs a sturdy button. Light fabric needs a light one.
- Match the use. Children’s clothes need safe, secure buttons. Work clothes need strong ones.
- Match the care. Check the button can survive washing and ironing.
- Check the holes. They should be smooth.
- Pick the right size. Use ligne measurement and a matching buttonhole.
- Think of color. Pick a shade that suits the fabric.
Final thoughts
A button looks like a tiny disc, but it has a face, rim, holes or shank and a back. Together with the thread and the buttonhole, these parts decide whether a garment closes well. When you check a button, look at the stitching first, then the holes, then the buttonhole. If the thread is strong, the holes are smooth and the buttonhole fits, the button will last.
Frequently asked questions
The main parts are the face, rim, holes or shank, and back. A sewn button also uses thread, which forms a thread shank.
The shank is a loop on the back of a button. It lifts the button away from the fabric and lets thick fabric fold under it.
A ligne is a unit used to measure button size. One ligne is 1/40 of an inch, about 0.635 mm. A 24 ligne button is about 15 mm wide.
A sew-through button has holes. A shank button has a loop on the back. Shank buttons are usually used on thick fabrics.
A thread shank is a small stem of thread left between a button and the fabric. It gives the button room to sit above thick fabric.
Two or four holes work well. Four holes give a stronger hold and a decorative look.
Use strong thread, sew enough stitches, make a thread shank for thick fabric and lock the stitches at the back. Check that the holes do not cut the thread.