Marker making in garments is the job of laying out all the pattern pieces for an order on a sheet that matches the width of the fabric. The marker shows the cutter exactly where to cut. It also decides how much fabric the order will use. A good marker saves fabric and gives clean, accurate parts. A poor marker wastes fabric, cuts pieces off grain and starts a chain of problems that show up later in sewing and in the final fit.
This guide explains what a marker is and the information needed to make one, the types of markers, the main rules of layout, the steps, and how to check a marker before cutting. It also looks at fabrics that need special care and the common errors. It is written for cutting managers, marker makers, merchandisers and pattern makers.
What a marker is and why it matters
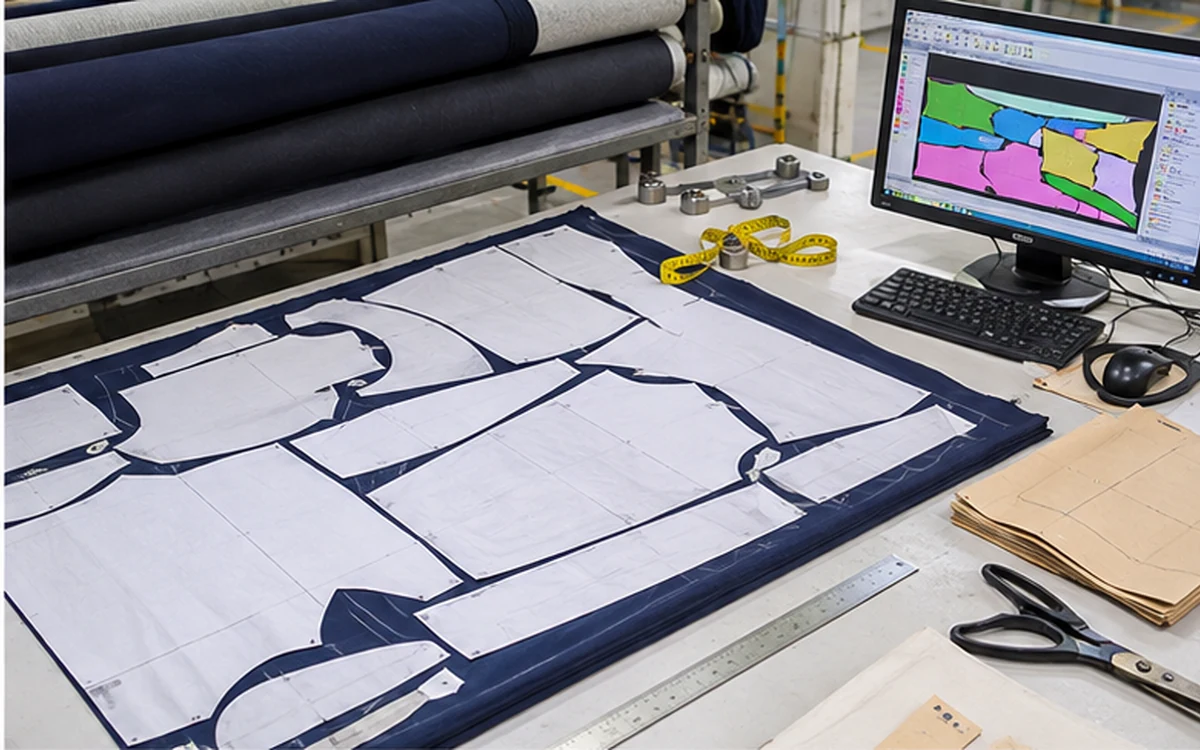
A marker is a layout of all the pattern pieces for one or more sizes, arranged on a rectangle that has the width of the fabric. It is printed or plotted on paper, laid over the fabric spread, and used as the guide for cutting. In some factories, the marker is used on screen only, and cut directly by a computer controlled cutter.
A marker matters for three reasons:
- Fabric cost. Fabric is the biggest cost in most garments. A marker that fits the pieces closely uses less fabric. See marker efficiency and fabric utilization.
- Garment quality. Pieces must be on the correct grain and in the right direction, or the garment will twist, hang badly or show shade differences.
- Cutting room speed. A clear, well labelled marker helps spreading and cutting go smoothly. See cutting section SOP in the garment industry.
Information needed before making a marker
The marker maker needs the facts below. Missing one of them is a common reason for a marker to be remade.
- Style and pattern. The final, approved pattern, with notches, drill marks, grain lines and labels.
- Sizes and ratio. Which sizes are in the order, and how many pieces of each size are in one lay. See cut order plan in a garment factory.
- Fabric width. The usable width, after leaving out the selvedge and any unusable edge.
- Fabric type and direction. Whether the fabric has a one way print or nap, stripes, checks, or a stretch direction.
- Number of plies and spreading method. This affects the marker length and the end allowance.
- Cutting instructions. Special notes, such as matching stripes, splitting pieces, or placing a print.
- Shrinkage allowance. If the pattern needs to allow for shrinkage. See knit fabric relaxation before cutting.
- Buyer rules. Some buyers set limits on how pieces may be arranged, how far they can be turned or how much fabric may be used. See tech pack for clothing.
Types of markers
By how it is made
- Manual marker. A person draws or places the pattern pieces by hand on paper. It is slow and depends on skill. It is still used in small shops and for quick checks.
- Computer (CAD) marker. Software places the pieces, either by the marker maker or with automatic nesting, and prints or plots the result. This is the standard in most export factories. See pattern grading for how patterns are prepared for the sizes.
By the sizes in it
- Single size marker. All pieces are for one size.
- Multi size (mixed) marker. Pieces from several sizes are nested in the same marker. It often gives better fabric use, because smaller pieces fill the gaps between larger ones.
By the fabric use
- Open marker. Pieces can be turned in either direction, so they fit more closely. It is used for fabrics with no direction.
- Closed (one way) marker. All pieces must face the same way, because of nap, a one way print, or a direction in the weave or knit.
Marker making rules
Rules differ a little between buyers and factories, but these are widely used.
- Follow the grain line. Each piece must lie on the grain line shown on the pattern, within the allowed tolerance. A piece off grain can twist or hang badly.
- Keep the direction right. For fabrics with nap, pile or a one way print, all pieces must face the same way. Mixing directions causes shade or print differences between parts of the same garment.
- Match the pieces that must match. Stripes, checks and large prints need pieces placed so the lines meet at seams, pockets and plackets.
- Keep the pieces apart by the minimum gap. Leave enough space for the knife to pass, so one piece does not damage another. The right gap depends on the cutter, the fabric and the ply height.
- Keep the pieces of one garment together. Where possible, all parts of one garment should come from the same lay, to avoid shade differences inside a garment.
- Balance the marker. Spread the pieces so the marker is not heavy at one end. This helps cutting accuracy and shade control.
- Put notches and marks on every piece that needs them, and check that they are printed or plotted.
- Label the marker with the style, size ratio, length, width, fabric, date and marker maker name. A missing label causes mix ups.
- Add end allowance at the start and end of the lay, as the spreading method needs.
- Do not overlap pieces, unless the cutting method allows it and the buyer agrees.
- Keep the fabric edge clear. Do not place pieces on the selvedge or the damaged edge.
- Split pieces only where allowed. Some styles allow a piece to be cut in parts to save fabric. Others do not.
Marker width, length and the size ratio
- Marker width is the usable fabric width. It is the width after leaving out the edges that cannot be used, such as selvedge marks, tentering holes and edge damage. If the marker is wider than the fabric, pieces will be cut short at the edge.
- Marker length is set by the pieces and by the cutting table and spreading method. A longer marker often gives better use of fabric, because the pieces fit together in more ways. But it is harder to handle and spread.
- Size ratio is the mix of sizes in one lay, such as how many of each size go into one marker. It follows the order quantity per size and the plan for the lay. A good ratio helps the marker fill the width, and keeps the number of lays and the end losses low.
The cutting plan sets these items together, so the marker maker, the planner and the cutting manager should agree on them.
Fabrics that need special care
Stripes and checks
Pieces must be placed so the pattern matches at key seams. This takes more fabric, and the marker must be made with the right stripe positions. Often some pieces are allowed a small shift, and others are not.
Prints and one way designs
Direction and placement matter. Large prints may need a certain part of the print in a certain place on each garment. This can make the marker much less efficient.
Fabrics with nap or pile
Velvet, corduroy, fleece and brushed fabrics look different from different directions. All pieces must face the same way.
Knit and stretch fabrics
The fabric must be relaxed before cutting, and the marker should follow the wale direction. Pieces cut from fabric that is still stretched can shrink back later.
Denim and washed fabrics
Marker planning may need to allow for shrinkage and for the shade of a fabric roll. See shrinkage control in fabric and garment factories.
Steps in making a marker
- Collect the inputs. Pattern, size ratio, fabric width, fabric type and special notes.
- Check the pattern files. Make sure all pieces are present, labelled and in the right size, with grain lines and notches.
- Set the marker width and the rules in the software, including the gap and the allowed turning.
- Place the pieces, either by hand or with automatic nesting, then improve the layout by hand.
- Check the layout for grain, direction, matching, gaps and balance.
- Read the marker efficiency from the software, and try to improve it if the layout allows.
- Print or plot the marker at full scale, and check a printed marker against a ruler for length and width.
- Label the marker, and record the file, the date and the version.
- Send it to the cutting room, with the cut plan.
Marker efficiency and how to improve it
Marker efficiency is the share of the marker area that is covered by pattern pieces. In plain terms:
Marker efficiency (%) = area of pattern pieces on the marker ÷ area of the marker × 100
A higher figure means less fabric is lost between the pieces. The worked method is explained in marker efficiency and fabric utilization. For the wider picture of where fabric is lost, see fabric wastage in garments.
Ways to raise it, without breaking the rules above:
- Use mixed size markers where the buyer allows it, so small pieces fill the gaps.
- Use open markers for fabrics that have no direction.
- Try more than one layout, and keep the best one.
- Change the size ratio a little, if the order allows, so the marker fills the width better.
- Use a longer marker when the cutting table and the plies allow it.
- Allow small turns on the grain, within the tolerance the buyer accepts.
- Check the fabric width, since using a wider usable width may allow a tighter layout. Ask the supplier for the real width.
- Review the pattern. Small changes by the pattern maker, such as shape of a piece, can help, but only with approval.
Do not push efficiency so far that quality is lost. A marker that saves a little fabric but puts a piece off grain is not a saving.
Checking a marker before cutting
Before the lay is cut, check the marker for the points below.
- Label matches the order, style and size ratio.
- Length and width are right. Measure the printed marker.
- All pieces are there, for every size in the ratio.
- Grain lines are within the allowed tolerance.
- Directions are correct for the fabric.
- Notches and marks are printed.
- Gaps are enough for the knife.
- Matching points for stripes and checks are marked.
- Efficiency is as planned.
- Marker is flat and clear, and the lines can be read.
A second person, not the marker maker, should check the first marker of a new style.
Common marker errors and causes
| Error | Likely causes |
|---|---|
| Marker wider than the fabric | Wrong fabric width entered, edge damage not counted |
| Piece off grain | Piece turned too far, rule not set, rushed layout |
| Wrong direction on a nap or print | Open marker used for a one way fabric |
| Missing piece | Pattern file incomplete, piece deleted by mistake |
| Wrong size ratio | Order change not updated, wrong file used |
| Pieces too close, knife damage | Gap too small for the cutter or the ply height |
| Pieces overlap | Software error, manual placing |
| Stripes or checks do not match | Match points not set, pieces shifted |
| Notches missing | Notch layer turned off, pattern not updated |
| Marker length wrong | Printer scale error, file scaled by mistake |
| Marker mixed up with another style | No label, files stored in the wrong place |
| Poor efficiency | No trial layouts, fixed ratio, poor nesting |
Many of these show up later as cutting defects, shade problems or fit complaints. See quality control of the garment cutting section.
Marker and cutting room links
A marker is one link in a chain. Before it, the planner sets the lay plan and the fabric is inspected and relaxed. After it, the fabric is spread, cut, numbered, bundled and sent to sewing.
- Spreading. The marker length, the number of plies and the end allowance must fit the spreading method. See fabric spreading methods in garment cutting.
- Cutting. The gap and the notch marks must suit the cutting machine. See cutting department in a garment factory.
- Consumption. The marker length per lay gives the fabric used per garment. See fabric consumption of a basic T-shirt.
- Spec and fit. The pattern must match the approved spec and the approved fit. See garment spec sheet and fit approval process in garments.
A change in one stage often needs a change in another, so keep the people in these stages in contact.
Final thoughts
Marker making in garments turns an approved pattern into a cutting plan on paper. A good marker follows the grain and direction rules, keeps the pieces apart by a safe gap, matches stripes and prints where needed, and carries a clear label. It also uses fabric well.
Collect all the inputs before you start, check the pattern files, make the layout, look at the efficiency, and have the first marker of a new style checked by a second person. Raise efficiency with care, and never at the cost of grain or quality. A few extra minutes on the marker can save fabric, and many hours of trouble later.
Frequently asked questions
A marker is a layout of all the pattern pieces for an order, arranged on a sheet that matches the fabric width. It guides the cutter and decides how much fabric is used.
It is the area covered by pattern pieces divided by the total marker area, multiplied by 100. A higher figure means less fabric left between the pieces.
A single size marker holds pieces of one size. A multi size marker nests pieces of several sizes together, which often gives better fabric use.
Pieces cut off grain can twist, hang badly or change shape after wash. The grain line on the pattern must lie along the grain of the fabric, within the allowed tolerance.
The marker length per lay, divided by the number of garments in it, gives the fabric used per garment. A closer layout means less fabric per garment.
Stripes, checks and large prints need pieces placed so the lines or designs meet at seams, pockets and plackets. This usually needs more fabric.
In most export factories, a marker maker or CAD operator in the cutting department or the pattern room makes it, using the approved pattern and the cut plan.