Ask a tailor for a measurement and you will hear one word again and again: girth. Girth measurement of body and garment is the distance around a part of the body, or around a garment at a chosen point. Chest girth, waist girth and hip girth are the three most used. They decide the size you buy, the pattern a designer cuts and the spec sheet a factory follows.
The idea is simple, but small mistakes cause big fit problems. A tape pulled too tight, a tape that slopes at the back or a flat garment width read as if it were a circle can all throw a size off by several centimetres. This guide explains what girth means, which girths matter, how to measure each one, how to move between body girth and garment width, and how to avoid common errors. A worked example near the end turns a body chest girth into a garment spec with ease and shrinkage included.
What does girth mean?
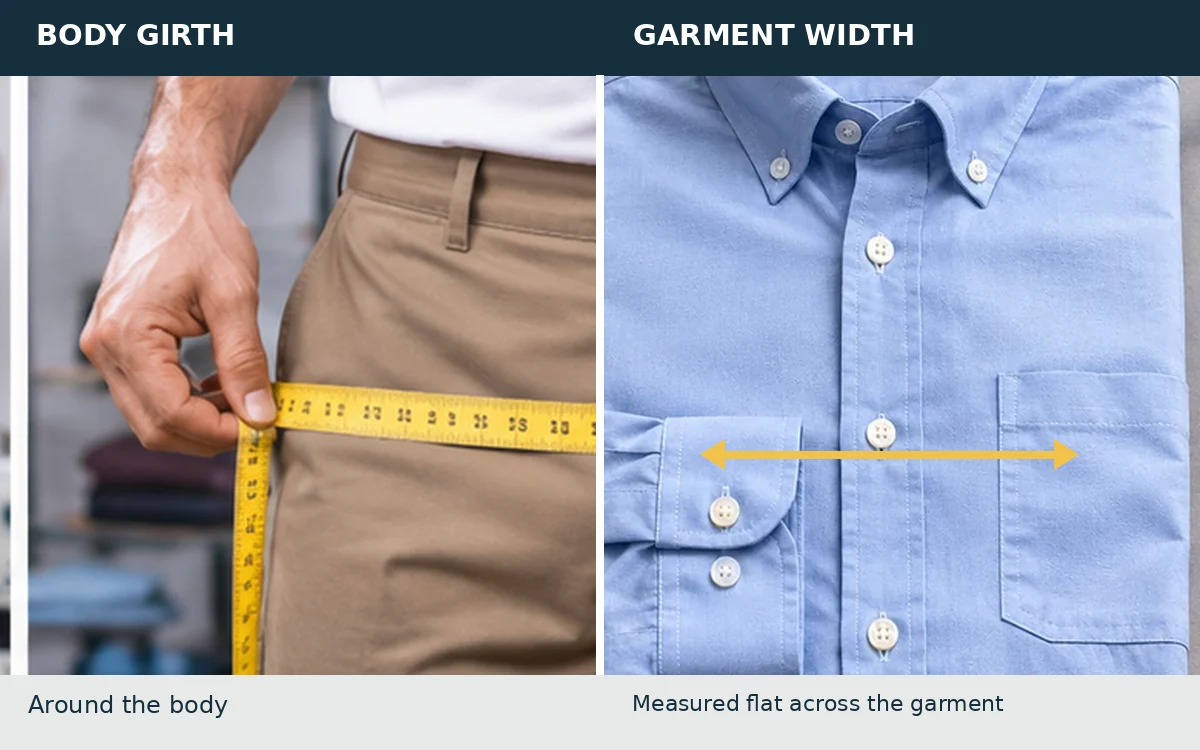
Girth is the circumference of a body part or garment area, measured with a flexible tape that goes all the way round. You may also hear “circumference” or “round” used for the same thing. In garment work, the word has two close meanings:
- Body girth. The distance around a person at a set landmark, such as the fullest part of the chest.
- Garment girth. The distance around a garment at a set point, such as the chest of a shirt or the hem of a skirt.
Because a garment usually lies flat on a table, the factory often measures half of the girth across the flat piece and doubles it. So a flat chest width of 52 cm means a chest girth of 104 cm. Keep this simple rule in mind: girth = flat width × 2, for a closed round garment.
The main body girths
| Girth | Where to measure |
|---|---|
| Neck | Around the base of the neck, where a shirt collar sits |
| Chest or bust | Around the fullest part of the chest, with the tape level across the back |
| Underbust | Directly under the bust, for bras and fitted tops |
| Waist | Around the natural waist, the narrowest part of the torso |
| High hip | Around the body a few centimetres below the waist |
| Hip (seat) | Around the fullest part of the buttocks |
| Thigh | Around the top of the thigh, just under the crotch |
| Knee | Around the centre of the knee |
| Calf | Around the fullest part of the lower leg |
| Upper arm (bicep) | Around the fullest part of the upper arm |
| Wrist | Around the wrist bone |
| Head | Around the forehead, above the ears, for hats and caps |
International practice for these body measurements is set out in ISO 8559-1, titled “Size designation of clothes, Part 1: Anthropometric definitions for body measurement”. The standard exists so that brands, mannequin makers and researchers describe the body in the same way. Your brand or buyer may also use its own measuring guide, so check which one applies.
What you need
- A soft, flexible tape measure, preferably fibreglass that does not stretch
- Light clothing or underwear, so the tape sits on the body shape
- A mirror, or a helper
- A notebook or phone to record numbers
- A string or thin elastic to mark the waist, if you want a fixed landmark
A rigid ruler or a metal tape will not wrap around a body. A stretched old cloth tape will give false numbers, so check yours against a ruler from time to time.
How to take a girth measurement: general rules
- Stand straight and relaxed. Breathe normally. Do not hold your breath or pull in your stomach.
- Keep the tape level. Check it in a mirror or with a helper. A tape that slopes at the back will read too long.
- Keep it snug, not tight. The tape should touch the body without pressing into it. A good test is to slide one finger under the tape. It should move with a little resistance.
- Read where the tape ends meet and write the number straight away.
- Measure twice. If the two readings differ, take a third and use the middle value.
How to measure each main girth
Chest or bust girth
Stand with your arms relaxed. Wrap the tape around the fullest part of the chest, across the shoulder blades at the back. For men, this is usually across the nipple line. For women, it is the fullest part of the bust. Keep the tape level at the back. This number selects the size of shirts, jackets and tops.
Underbust girth
Place the tape directly under the bust, at the line where the bra band would sit. Breathe out gently and read. Our guide to the parts of a bra shows why this band measure matters for fit.
Waist girth
Find your natural waist. A quick way is to bend sideways and note where the body creases. Wrap the tape there. Do not measure over a belt or a bulky waistband. Waist girth sets the size of trousers, skirts and fitted dresses.
Hip (seat) girth
Stand with feet together. Wrap the tape around the fullest part of the buttocks, keeping it level all the way round. The fullest part is often 18 to 23 cm below the waist, but it varies by person, so look in the mirror instead of using a fixed number.
Thigh girth
Stand with weight evenly on both feet. Place the tape around the top of the thigh, just below the crotch line. This number guides the fit of trousers and jeans.
Neck girth
Place the tape around the base of the neck, resting where a collar would sit. Add a finger of space for comfort. Shirt makers use this number for collar size. For more on the collar, see our page on shirt measurements.
Head girth
Place the tape around the forehead, just above the eyebrows and ears, and at the widest part of the back of the head. Use this for hat sizes.
Girth measurement of garments
In a factory, the quality team measures girth on finished garments and compares the numbers with the spec sheet. Garments are laid flat on a table, smoothed gently without stretching, and measured straight across. The flat width is then doubled to give the girth.
| Point of measure | Where the tape goes (flat garment) |
|---|---|
| Chest | 2.5 cm below the armhole, straight across |
| Waist | At the narrowest point or a set distance from the shoulder |
| Hem | Straight across the bottom edge |
| Sleeve opening | Straight across the cuff or sleeve edge |
| Thigh | Across the garment 2.5 cm below the crotch seam |
| Hip | Across the pant at a set point below the waistband |
The exact points differ between brands, so always follow the buyer’s measuring instructions. You can see how these points are named in our guide to pant measurements, leg opening and rise, and in the page on the measurement of top and bottom garments. A spec sheet that includes girth points is explained in what a garment spec sheet contains.
Body girth and garment girth are not the same
A garment is always larger than the body it covers. The difference is called ease. There are two kinds:
- Wearing ease. The extra room that lets you breathe, sit and move.
- Design ease. The extra room added for style, such as an oversized shirt.
A close-fitting stretch top may have little or even negative ease, because the fabric stretches. A loose jacket may have 15 cm or more. The fit depends on the fabric, the style and the market.
| Garment type | Typical ease on chest or hip |
|---|---|
| Stretch T-shirt, slim fit | Small, 0 to 6 cm |
| Regular woven shirt | About 8 to 14 cm |
| Jacket or coat | About 12 to 20 cm |
| Oversized style | 20 cm and above |
These ranges are common starting points, not rules. Brands set their own, and the correct ease for a given style comes from fit testing on a real person.
Common mistakes
- Pulling the tape too tight. This makes the body look smaller than it is, and the garment will feel tight.
- Measuring over thick clothes. A sweater adds several centimetres.
- Letting the tape slope. The back of the tape drops, so the reading is too long.
- Reading a flat width as the girth. Always double a flat width before comparing it with a body measure.
- Mixing units. Check whether a chart is in inches or centimetres. One inch is 2.54 cm.
- Using a stretched tape. Replace it if it has been used for a long time.
- Ignoring fabric stretch. A knit can stretch 30 percent or more at the waistband, so the relaxed girth and the stretched girth are different numbers.
A worked example: from body girth to garment spec
Let us build a spec for a woven shirt and then check a stretch waistband. All numbers are examples.
Part 1: Chest girth, ease and flat width
- Body chest girth: 96 cm
- Chosen wearing and design ease for a regular shirt: 8 cm
Step 1: Garment chest girth = 96 + 8 = 104 cm
Step 2: Flat chest width = 104 ÷ 2 = 52 cm
The spec sheet would list “chest, 2.5 cm below armhole, flat: 52 cm”.
Part 2: Allow for shrinkage
The fabric shrinks 2 percent in width after washing. The garment must be cut and sewn larger so that it ends at 52 cm after washing.
Pre-wash flat width = 52 ÷ (1 − 0.02) = 52 ÷ 0.98 = 53.1 cm
Check: 53.06 × 0.98 = 52.0 cm. The factory therefore builds the shirt at 53.1 cm flat. Our guide to pattern making based on fabric shrinkage explains this step in more detail.
Part 3: Tolerance
A factory spec might allow a tolerance of ±1 cm on the flat chest width. Because the girth is double the flat width, that tolerance becomes ±2 cm on the girth. Two shirts of the same size can therefore differ by up to 4 cm in girth (from 102 to 106 cm) and still pass. Buyers who need a tighter fit set a smaller tolerance.
Part 4: Inches to centimetres
A customer gives a chest measurement of 38 inches. Convert: 38 × 2.54 = 96.5 cm. This is close to the 96 cm example above, so the same spec applies.
Part 5: A rough check on a limb
Thigh girth is often hard to picture. If a thigh girth is 56 cm, and you treat the cross-section as a circle, the diameter is 56 ÷ π = 17.8 cm. Real thighs are not perfect circles, so treat this only as a rough check. It still helps you see that a 56 cm girth needs a flat pant width of at least 28 cm at that point, before ease.
Part 6: A stretch waistband
A woman has a waist girth of 80 cm. A knit waistband has a relaxed flat width of 34 cm, so its relaxed girth is 68 cm. When stretched to its limit it measures a flat 46 cm, or a girth of 92 cm.
Stretch ratio = 92 ÷ 68 = 1.35, which is about 35 percent elongation.
To pull the waistband over the hips, it must reach at least the hip girth. If her hip girth is 100 cm, then 92 cm is not enough. That waistband needs a zip, a button or more stretch. This is the kind of check that saves a bad fit before the garment is sewn.
Girth measurement for sizing charts
Sizing charts list body girths for each size, such as chest, waist and hip. A person picks the size by comparing their numbers with the chart. When the person falls between sizes, a few rules help:
- Choose by the largest girth for fitted clothes in woven fabric.
- Choose by chest for tops and by hip for trousers if the numbers disagree.
- Size up if you prefer a loose fit, or if the fabric does not stretch.
- Look at the garment’s own measurements if the brand lists them, since these tell you the ease.
For children, girth measurement is tricky because they grow fast. Our children’s clothing size chart by age shows how sizes link to body measures. If you need to see how sizes step up from one to the next, read our guide to pattern grading, where girth increases between sizes are set.
Taking girth measurements for a bulk order
When a factory measures samples from a bulk order, a few habits keep the numbers honest.
- Lay the garment flat on a clean table and smooth it gently by hand.
- Do not stretch it, but do not leave wrinkles in the measuring line either.
- Use the same tape and the same person for all samples, or at least train people to read the tape the same way.
- Measure at the same stage each time, for example after wash and relaxation.
- Record every number, not just the pass or fail result.
- Compare the mean and the spread with the spec.
A shirt that is always 1 cm too narrow on the flat chest is a pattern problem. A shirt whose width jumps around by 3 cm from piece to piece is a cutting or sewing problem. Records make the difference visible.
Tips for home users
- Measure yourself in the morning, since body size can change a little during the day.
- Keep a record of your measurements, with the date.
- Take a measurement of a garment that fits you well. Lay it flat, measure across, and double it. Use this when buying online.
- Check the stretch of the fabric. Knits and fabrics with elastane forgive more.
- Re-measure after big changes such as weight loss or gain, or pregnancy.
Final thoughts
Girth measurement is the distance around a body part or a garment, taken with a flexible tape that sits level and snug. Chest, waist and hip girth drive most sizing. Garments are usually measured flat and doubled, and the difference between body and garment is ease. Washing shrinkage, tolerance and fabric stretch all change the final numbers.
Our worked example turned a 96 cm chest into a 104 cm garment girth and a 52 cm flat width, then moved to 53.1 cm to cover 2 percent shrinkage. Measure twice, double flat widths, add ease on purpose and write everything down. That is how a size chart becomes a garment that fits.
Frequently asked questions
It is the measurement around a body part or a garment, taken with a flexible tape that goes all the way round. It is also called circumference.
Chest or bust, waist and hip are the three most common. Neck, thigh, knee, calf, upper arm, wrist and head are also used.
Double the flat width. A closed round garment with a flat chest width of 52 cm has a chest girth of 104 cm.
Ease is the extra room between the body and the garment. It lets a person move and breathe, and it can also be added for style.
Snug, but not tight. It should touch the body without pressing into it, and you should be able to slide a finger under it.
In clothing, yes. Girth and circumference both mean the distance around a body part or a garment.
Brands use different charts, ease and fits. Compare your body girths with the chart, and if the brand lists garment measurements, compare those with a garment that already fits you.