
A white bra cup comes out of the mold looking fine, passes the first check and ships. Weeks later a buyer opens a carton and finds a cream or yellow tint. Or the cup is yellow straight off the machine. Either way, someone asks the same question: why white nylon bra cups turn yellow, and whose fault is it?
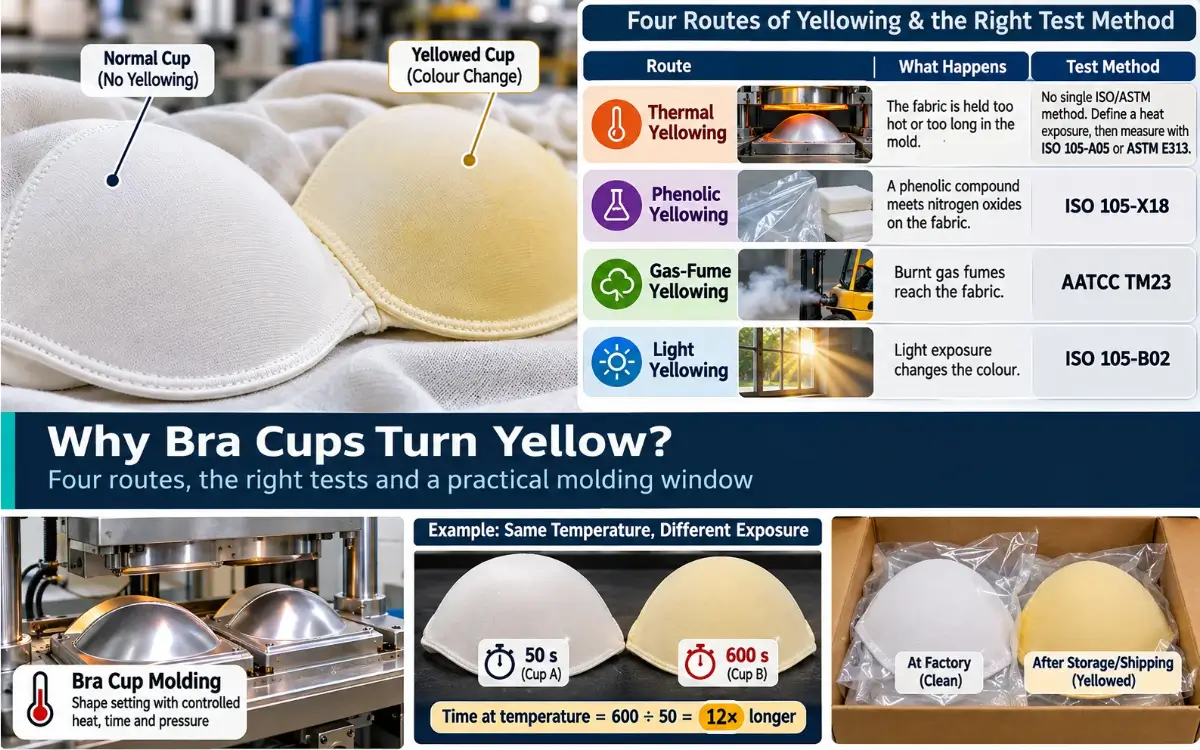
The honest answer is that there is no single cause. Yellowing in a molded cup can come from heat in the mold, from chemicals in the packaging, from fumes in the warehouse, from light, or from the spandex in the fabric instead of the nylon. These routes look alike on the shelf but need different tests and different fixes. Mix them up and you can spend months changing the wrong thing.
This guide separates the four routes, shows which test method fits each one, explains why a yellow cup is not always a nylon problem and gives a way to set a molding window you can repeat. It ends with the questions to put to a fabric supplier. There are three worked examples with the arithmetic shown.
The short answer: four routes, four tests
| Route | What happens | Test method |
|---|---|---|
| Thermal yellowing | The fabric is held too hot or too long in the mold | No single ISO or ASTM method. Define a heat exposure, then measure with ISO 105-A05 or ASTM E313 |
| Phenolic yellowing | A phenolic compound meets nitrogen oxides on the fabric | ISO 105-X18 |
| Gas-fume yellowing | Burnt gas fumes reach the fabric | AATCC TM23 |
| Light yellowing | Light exposure changes the colour | ISO 105-B02 |
Keep this table in mind as you read. Each section below belongs to one row.
Nylon 6 and heat: exposure is more than a number
Most molded cups, used in many of the types of lingerie sold today, use a nylon 6 knit, often with spandex. For background on the fibre itself, see our page on nylon 6 versus nylon 66. Nylon 6 melts at roughly 215–220°C, but it does not need to melt to suffer. Its continuous-use temperature in air is about 93°C; nylon 66 is about 130°C. 130°C is the continuous-use figure for nylon 66, not nylon 6. This matters because the article links to our guide, which uses 93°C for nylon 6. A bra cup mold runs far above that.
That sounds alarming, yet molding works every day. The reason is that heat damage depends on how long the fabric sits at a temperature as well as on the temperature itself. A short molding cycle and a long dwell are not the same exposure. A fabric that sees 200°C for under a minute is in a very different state from one that sits at 200°C for ten minutes because the line stopped or a batch was reworked.
When people search for the right bra cup molding temperature, they often want a single magic number. A better question is: what temperature does the fabric surface reach, for how many seconds, and how many times? The numbers that follow in this guide are starting points for a trial, not a promise that one setting suits every fabric.
Worked example 1: the same temperature, two exposures
Take two cups molded at 200°C.
- Cup A is in the mold for 50 seconds.
- Cup B is left for 10 minutes while a machine fault is fixed. Ten minutes is 600 seconds.
Time at temperature for B compared with A = 600 ÷ 50 = 12 times longer.
Both cups can be described as “molded at 200°C”, and a record that stops there hides a twelve-fold difference. This is why a molding log should note time as well as temperature. If a cup is molded twice after a rework, count both cycles. Two 50-second passes add up to 100 seconds of heat, which is twice the exposure of one pass.
Heat does two jobs at once. It sets the shape of the cup, and it slowly damages the polymer. Yellowing is the part you can see. Loss of strength is the part you cannot, which is why the strength check later in this guide matters.
Four yellowing routes that should not be mixed
1. Thermal yellowing
This is the heat route described above. The fabric turns yellow because of the heat exposure itself. There is no single ISO or ASTM method for it. That surprises many buyers who expect a standard to exist.
So you build your own test in two parts:
- Define the heat exposure. Choose a temperature, a time and the way the fabric contacts the heated surface. Write it down so anyone can repeat it.
- Measure the colour change. Use ISO 105-A05 (instrumental assessment of change in colour) or ASTM E313 (yellowness index). Measure before and after on the same spot.
Because the exposure is defined by you, two labs can only compare results if they use the same exposure. Put the exposure in the test report, or the numbers mean little.
2. Phenolic yellowing
Phenolic yellowing is a chemical reaction. Certain phenolic compounds, such as the antioxidants added to plastic bags and foam, can react with nitrogen oxides in the air and leave a yellow stain on the fabric. The test method is ISO 105-X18, which assesses the potential of a material to cause or suffer phenolic yellowing.
Notice what this means. A cup can be perfectly molded and still yellow in a carton because of what it was packed with. The heat in the mold is not involved. If a cup is clean when it leaves the factory and yellow on arrival, think about this route as well as the thermal one. We look at the storage side in a later section.
3. Gas-fume yellowing
Combustion gases such as those from forklifts, trucks or gas heaters can reach fabric in a warehouse or loading area. The test method is AATCC TM23, which exposes fabric to burnt gas fumes. It is a different test from ISO 105-X18, even though both can end in a yellow tint. One checks the fabric against combustion fumes. The other checks its tendency toward phenolic yellowing. Do not report one as if it were the other.
4. Light yellowing
Light, including daylight through a window or strong store lighting, can change fabric colour over time. The test method is ISO 105-B02. Our guide to colour fastness to light explains the method and the blue wool scale. A general overview of other fastness tests is on our page about colour fastness tests and grades.
A simple way to keep the routes apart
| Question | If yes, look first at |
|---|---|
| Is the cup yellow right after molding? | Thermal route, or the spandex |
| Was it clean at the factory and yellow after a carton or container trip? | Phenolic or gas-fume route |
| Is yellowing stronger on the side that faced a window or light? | Light route |
| Is the yellow even across the whole cup, or does it follow the mold edge or a hot spot? | Thermal route (check the mold surface) |
| Does the yellow match the pattern of a polybag, foam sheet or forklift lane? | Phenolic or gas-fume route |
These are clues, not proof. Always confirm with the matching test.
Spandex is the other half
Many cup fabrics are nylon with a share of spandex (also called elastane or Lycra) for stretch and recovery. Our guide to spandex, elastane and Lycra covers the fibre.
Spandex is more heat-sensitive than many people think. It softens around 175 to 200°C and can yellow above about 150°C. A mold running at 190 to 210°C is therefore above the softening range of spandex. A yellow cup is not always a nylon problem. The spandex can be the part that turned.
How can you tell? A few practical steps:
- Ask the mill for the fibre content, including the spandex percentage.
- Compare the yellowing of a nylon-only swatch with a nylon and spandex swatch, exposed to the same heat.
- Look at the stretch recovery. Spandex that has been overheated loses its snap, and the cup can lose its shape.
If the nylon-only swatch stays white and the blended swatch yellows, you have your answer. Changing the nylon grade will not help. The remedy is a lower exposure, a different spandex or a protective construction. If both yellow, the nylon is involved too.
Strength after molding
A cup can look white and still be weak. Heat damages polymer chains, and the fabric can lose strength even when the colour is fine. So test strength before and after molding, and look at colour too.
For the test, use a fabric grab test, ASTM D5034. This method holds the fabric with wide jaws and pulls it to break. ASTM D5035 (the strip method) is not recommended for knits or for fabrics with more than about 11 percent stretch. Most cup fabrics are stretchy knits, so D5034 is the better fit.
Worked example 2: strength retention and yellowness
Suppose a mill runs five grab tests on the flat fabric before molding and five on cups cut after molding. These numbers are an example of how to record results.
| Test | Before molding (N) | After molding (N) |
|---|---|---|
| 1 | 412 | 351 |
| 2 | 408 | 360 |
| 3 | 421 | 344 |
| 4 | 405 | 357 |
| 5 | 419 | 349 |
| Mean | 413.0 | 352.2 |
Retention = 352.2 ÷ 413.0 × 100 = 85.3 percent
So the molded cup keeps about 85 percent of its grab strength. Whether that is acceptable depends on the product and the buyer, and many buyers publish their own test requirements. The point is to have the number, set a limit with the buyer and watch it as the process changes.
Next, the colour. A spectrophotometer reads the yellowness index (ASTM E313) on the same spot before and after molding.
- Before molding: 3.1
- After molding: 6.4
- Change = 6.4 − 3.1 = 3.3
Report both the change and the exposure used. A change of 3.3 means little without knowing the temperature, time and contact. An acceptable limit is an agreement between you and your buyer, not a figure from a standard, because there is no single thermal yellowing method.
Setting a repeatable window
Many mills set the machine to 200°C and assume the fabric sees 200°C. The set point is a control reading. It is not necessarily the temperature at the fabric surface. Mold plates can be hotter in one place and cooler in another, and a sensor can sit far from the face of the mold.
Follow these steps.
- Measure the mold surface. Use a calibrated surface probe or thermocouple at several points, including the centre, the edge and the corners.
- Start at 190 to 210°C and 45 to 60 seconds. This is a starting range for a trial. Pick a point inside it, for example 200°C and 50 seconds, and note the exact settings.
- Run a documented trial. Mold a sample batch with the chosen settings. Record the surface readings, the time, the fabric lot and the operator.
- Test the results. Measure colour (ISO 105-A05 or ASTM E313), strength (ASTM D5034) and the shape of the cup.
- Adjust one thing at a time. Change time or temperature, not both. Run another trial.
- Lock the window. Write the temperature range, time range and test results into a standard procedure.
Worked example 3: reading the mold surface
A technician reads the surface of one mold plate at five points while the machine is set to 200°C.
| Point | Reading (°C) |
|---|---|
| Centre | 199 |
| Left edge | 192 |
| Right edge | 203 |
| Top | 207 |
| Bottom | 196 |
- Mean = (199 + 192 + 203 + 207 + 196) ÷ 5 = 997 ÷ 5 = 199.4°C
- Spread = 207 − 192 = 15°C
The mean looks right. The spread tells a different story. The top of the mold runs 7°C above the set point, and the left edge runs 8°C below it. In a 190 to 210°C window every reading is inside the range, but the cup is not being treated evenly. A fabric panel placed near the top will see more heat than one near the left edge. If yellowing shows up on one side of the cup, this is the first place to look. The fix may be heater balance, plate maintenance or placement, and then a new reading.
If a reading ever goes outside the trial window, such as a hot spot at 214°C, stop and fix the mold before running more product.
Also record how often the mold is opened and how long it takes to reheat. Repeated opening cools the surface and can make the next cycle behave differently.
Why white bra cups turn yellow in storage
Everything above happens in the factory. Some yellowing only appears later, after the cups are packed and stored. The material on this route has been described in detail in the story on why white bra cups turn yellow in storage, and the short version is useful for any buyer or planner.
Cups can pick up a phenolic compound from packaging materials or from foam and meet nitrogen oxides from the air. Warehouses with combustion engines, loading docks with idling trucks and container yards are common sources of those gases. The result is yellowing that was not there when the cups left the line.
Practical steps for storage include:
- Ask what is in the packaging and whether it contains phenolic antioxidants. A written fabric warehouse procedure helps your team follow the same rules every time.
- Keep forklifts and trucks away from the packing area, or use electric equipment where you can.
- Avoid storing cups in tight contact with materials that may carry the compound.
- Test the packed product as well as the loose fabric. Our guide to fabric warehouse and cutting section practices covers some basics of storage.
A cool, dry and dark store is good practice for any fabric, but it does not by itself stop a chemical reaction between a phenolic compound and nitrogen oxides. Test for the route (ISO 105-X18 for phenolic potential, AATCC TM23 for burnt gas fumes) and do not assume that good storage conditions cover it.
What to ask a fabric supplier
A supplier who says “our nylon is Grade A” has told you very little. Grades are not a standard, and one supplier’s Grade A is another’s Grade C. Ask for documents that you can check.
- An additive declaration. What stabilizers, antioxidants and finishes are in the fabric and foam? Do any of them contain phenolic compounds? This helps you judge the phenolic route.
- A heat-exposure report. What temperature, time and contact method was used in testing, and what was measured before and after? Ask for ISO 105-A05 or ASTM E313 data and the grab strength (ASTM D5034) results.
- Fibre content. Including the spandex percentage and type.
- Test reports for ISO 105-X18, AATCC TM23 and ISO 105-B02, with the lab name and the date. Make sure each report names the method it used.
- Lot traceability. Which fabric lot and which date, so a problem can be traced back.
- Packaging advice. The packaging that was used in testing and what the supplier recommends.
Compare the supplier’s exposure with your own mold. If their test used 180°C for 30 seconds and you mold at 205°C for 60 seconds, their report does not describe your process. Ask them to repeat it at your conditions, or run your own trial.
For more on the product itself, see our guides to the parts of a bra and the types of women’s innerwear.
A quick checklist
- Record temperature and time for every cycle, including reworks.
- Measure the mold surface and compare it with the set point.
- Keep spandex in mind when you diagnose yellowing.
- Test strength as well as colour.
- Name the method for every result. Do not call a burnt gas fume result a phenolic result.
- Test the packed product after a realistic storage period.
- Keep supplier documents on file with lot numbers.
Final thoughts
Why white nylon bra cups turn yellow has more than one answer. Heat in the mold, spandex that softens before the nylon does, phenolic compounds meeting nitrogen oxides, burnt gas fumes and light each leave a similar tint, and each needs its own test. Thermal yellowing has no single standard method, so you define the heat exposure and measure it with ISO 105-A05 or ASTM E313.
Our examples showed how a ten-minute stoppage means twelve times the heat of a 50-second cycle, how a mold with a good average can still have a 15°C spread and how a cup can keep only about 85 percent of its strength while looking white. Start with a measured mold, a defined window and a documented trial. Then ask your supplier for evidence you can check. Once you know which route you are on, the fix usually becomes much clearer.
Frequently asked questions
There are four main routes: thermal yellowing from molding heat, phenolic yellowing from a chemical reaction, gas-fume yellowing from burnt gases and light yellowing. The spandex in the fabric can also be the part that yellows.
No single ISO or ASTM method covers it. Define a heat exposure and measure the colour change with ISO 105-A05 or ASTM E313.
It assesses the potential for phenolic yellowing of a material. It is different from AATCC TM23, which covers burnt gas fumes, and ISO 105-B02, which covers light.
Spandex softens around 175 to 200°C and can yellow above about 150°C, so it can be affected at molding temperatures.
Use a fabric grab test, ASTM D5034. ASTM D5035 is not recommended for knits or for fabrics with more than about 11 percent stretch.
Measure the mold surface, then start at 190 to 210°C and 45 to 60 seconds. Confirm the final settings with a documented trial.
Ask for an additive declaration and a heat-exposure report, along with fibre content, test reports that name their methods and lot traceability.

