This shirt measurements guide starts with a problem most of us know. You order a shirt online and the size says medium, but the sleeves hang past your knuckles. Or the collar looks right and the chest pulls across the buttons. “Medium” means different things to different brands, while a tape measure always means the same thing.
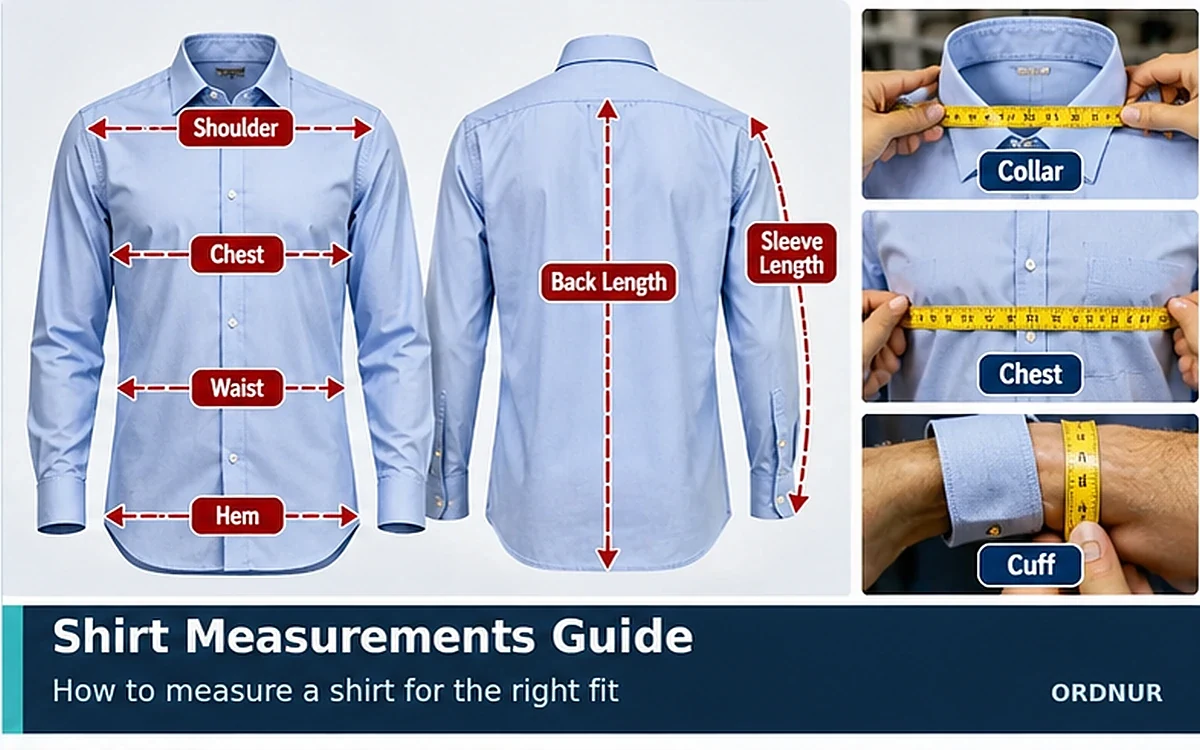
Here you will see what to measure, how to do it correctly on your body and on a shirt you already own, how much extra room (ease) a good fit needs and how to turn your numbers into a size. It also covers how garment factories describe shirt measurements, so you can read a spec sheet. There is a full worked example with centimetres and inches. If you work in a factory and want the full list of points on a garment, our guide to the garment spec sheet is a helpful companion.
What you need
- A soft tape measure (a flexible tailor’s tape, not a metal builder’s one)
- A mirror or a helper
- A notebook or phone to record numbers
- A shirt that fits you well, if you want to copy its measurements
- Light clothing. Measure over a thin T-shirt or underwear, not a bulky jumper.
Stand up straight with your arms relaxed at your sides. Breathe normally. Keep the tape snug but not tight. Measure twice and record the average.
The key shirt measurements
1. Chest
On the body: Wrap the tape around the fullest part of the chest, under the arms and across the shoulder blades. Keep it level. This gives the chest circumference.
On a shirt: Lay the shirt flat, buttoned. Measure straight across from one armpit seam to the other, about 2.5 cm (1 inch) below the armhole. This is the pit-to-pit measurement. Double it for the full circumference.
2. Shoulder
On the body: Measure from the outer edge of one shoulder bone to the other, across the back. A helper makes this easier.
On a shirt: Lay it flat. Measure from the shoulder seam at one end, across the back, to the seam at the other end.
3. Sleeve length
On the body: Bend your arm slightly. Measure from the centre of the back of the neck, across the shoulder, down the arm to the wrist bone. A helper is useful.
On a shirt: Measure from the shoulder seam (where the sleeve meets the shoulder) along the top of the sleeve to the end of the cuff. For dress shirts sold by neck and sleeve, the sleeve number is usually from the centre back, so a shirt-only measurement will be shorter than the label figure.
4. Neck (collar)
On the body: Wrap the tape around the base of the neck where a collar sits. Place one finger between the tape and your neck, so you have room to breathe.
On a shirt: Button the top button. Measure from the centre of the button to the far end of the buttonhole, along the collar band. That figure is the collar size.
5. Body length
On the body: Measure from the base of the neck at the shoulder down to where you want the shirt to end, for example mid-hip.
On a shirt: Measure from the highest point of the shoulder, beside the collar, straight down to the bottom hem.
6. Waist (for fitted shirts)
On the body: Measure around the narrowest part of the torso, usually above the belly button.
On a shirt: Lay it flat and measure across at the waist level, then double it.
7. Cuff and bicep (for fitted or short sleeves)
On the body: Measure around the widest part of the upper arm (bicep) and around the wrist.
On a shirt: Measure across the sleeve just below the armhole and across the cuff, then double each.
Ease: why the shirt must be bigger than your body
A shirt is never the same size as your body. It needs extra room, called ease, so you can move, breathe and sit. Different fits use different amounts of ease at the chest.
| Fit | Typical chest ease | Look |
|---|---|---|
| Skinny or extra slim | About 4 to 8 cm (1.5 to 3 in) | Very close |
| Slim | About 8 to 12 cm (3 to 4.5 in) | Close, tailored |
| Regular or classic | About 12 to 18 cm (4.5 to 7 in) | Comfortable |
| Relaxed or oversized | About 18 cm and more (7 in and more) | Loose |
Knit shirts such as polos and T-shirts use less ease because the fabric stretches. A woven shirt needs more because it does not. These ranges are guides. Brands set their own, so compare with a shirt that fits you.
A worked example: finding the right size
Let us follow a customer from tape measure to size.
Step 1: Body measurements.
- Chest: 98 cm
- Neck: 38.5 cm
- Sleeve (centre back to wrist): 84 cm
- Shoulder width: 45 cm
Step 2: Choose the fit and add ease.
The customer wants a slim fit with about 10 cm of chest ease.
Shirt chest circumference = 98 + 10 = 108 cm
Step 3: Convert to the flat measurement a brand lists.
Pit-to-pit (flat) = 108 ÷ 2 = 54 cm
So the customer should look for a shirt with a pit-to-pit of about 54 cm.
Step 4: Convert to inches.
1 inch = 2.54 cm.
- Chest 98 cm ÷ 2.54 = 38.6 in
- Shirt chest 108 cm ÷ 2.54 = 42.5 in
- Flat 54 cm ÷ 2.54 = 21.3 in
Step 5: Collar size.
Neck 38.5 cm ÷ 2.54 = 15.16 inches. Shirts are sold in half-inch steps, so round up to 15.5 inch collar (39.4 cm). The extra gives a little comfort room.
Step 6: Sleeve length.
84 cm ÷ 2.54 = 33.07 inches, so the sleeve is about 33 inch. For dress shirts sold as 15.5/33, this person would choose that pair.
Step 7: Check with a common size chart.
A typical men’s chest chart (in the US and many other markets) looks like this:
| Size | Body chest (in) | Body chest (cm) |
|---|---|---|
| S | 34 to 36 | 86 to 91 |
| M | 38 to 40 | 96.5 to 101.5 |
| L | 42 to 44 | 106.5 to 111.5 |
| XL | 46 to 48 | 117 to 122 |
| XXL | 50 to 52 | 127 to 132 |
The customer’s chest of 38.6 inches falls in size M. A medium slim fit shirt with a flat chest near 54 cm would fit well. Always check the brand’s own chart, because sizes are not standard from one brand to another.
Comparing with a shirt you already own
The easiest method is to measure a shirt that fits well and compare it to the size chart of a new shirt.
- Lay the shirt on a flat table and smooth out wrinkles.
- Measure pit to pit, shoulder, sleeve, body length and collar.
- Write down the numbers.
- Compare with the product’s listed measurements. Differences of 1 cm (0.4 in) are normal, and more than 2 cm in the chest will be noticeable.
Be careful that the brand states whether measurements are of the body or of the garment. Garment measurements already include ease.
How factories measure shirts
In garment manufacturing, each shirt style has a measurement chart (or spec sheet) listing points of measure (POM) and a tolerance for each. Here is a short example for a men’s woven shirt in size M.
| Point of measure | How to measure | Size M (cm) | Tolerance (cm) |
|---|---|---|---|
| Chest | 2.5 cm below armhole, across | 56 | ± 1.0 |
| Waist | At waist level, across | 53 | ± 1.0 |
| Hem sweep | Across the bottom | 55 | ± 1.0 |
| Shoulder | Seam to seam | 46 | ± 0.5 |
| Sleeve length | From shoulder seam to cuff edge | 62 | ± 1.0 |
| Body length | From high point shoulder to hem | 76 | ± 1.0 |
| Collar | Button centre to end of buttonhole | 39 | ± 0.5 |
| Cuff | Across, closed | 12 | ± 0.5 |
Quality inspectors measure a sample of finished shirts against this chart. If a measure falls outside tolerance, the shirt is marked as a measurement defect. For a related guide on a knit garment, see our page on measurement of a T-shirt.
Grade rules
From size to size, each point changes by a set amount, called the grade. For a men’s woven shirt, a common grade is about 4 to 5 cm in the chest circumference between sizes, which means about 2 to 2.5 cm in the flat chest. Sleeve and body length change by smaller steps, around 1 to 1.5 cm. Our guide to pattern grading in garments explains how this works.
Example: If size M has a flat chest of 56 cm and the grade is 2.5 cm, then L is 58.5 cm, XL is 61 cm, and S is 53.5 cm.
Fabric consumption
Larger measurements use more fabric. For a look at how this adds up in production, see our guide to the fabric consumption of a basic shirt.
Fit problems and what they mean
| Problem | Likely measurement cause | Fix |
|---|---|---|
| Tight across the chest | Not enough chest ease | Size up or choose a relaxed fit |
| Loose at the waist | Too much waist ease | Choose slim or taper |
| Shoulder seams hang off the arm | Shoulder too wide | Smaller size or different fit |
| Shoulder seams dig into the neck | Shoulder too narrow | Larger size |
| Sleeves too long | Sleeve length too big | Shorter sleeve size or alter the cuff |
| Collar tight | Collar size too small | Go up half an inch |
| Collar gapes | Collar too big | Go down half an inch |
| Shirt rides up | Body length too short | Choose a longer length |
Shrinkage matters too. A cotton shirt can lose 2 to 4 percent in length after washing, so a snug fit may become too tight. See our guide on how to prevent clothes from shrinking.
Women’s shirts
For women, add bust, waist and hip measurements.
- Bust. Around the fullest part of the chest, with the tape level at the back.
- Waist. Around the narrowest part.
- Hip. Around the widest part of the hips, if the shirt is long.
Women’s sizes also vary by brand. The same ease ideas apply. Check the garment measurements rather than the letter size when possible.
Tips for accurate measuring
- Use a soft tape and keep it level.
- Do not pull the tape tight, and do not leave it loose.
- Stand naturally. Do not puff out your chest.
- Measure over thin clothes.
- Ask a friend to help with shoulders and sleeves.
- Measure at the same time of day, if your body changes through the day.
- Record numbers in both centimetres and inches.
- Check the size chart of every brand before you buy.
Final thoughts
A good shirt fit is a matter of a few numbers: chest, shoulder, sleeve, collar and length. Measure your body, add the right ease for the fit you like, convert to the flat measurements that brands list and compare with a shirt that already fits. Our worked example showed how a 98 cm chest becomes a 108 cm shirt, a flat 54 cm pit-to-pit and a 15.5 inch collar.
If you buy or make shirts for a business, the same numbers sit on your spec sheet with a tolerance, and they are the base of grading, cutting and quality checks. Learn to read them, and fit problems become much easier to solve.
Frequently asked questions
Measure your chest, shoulder, sleeve length, neck and body length with a soft tape. Add ease for the fit you want and compare with the brand’s size chart.
Lay it flat. Measure pit to pit across the chest, shoulder seam to seam, sleeve from the shoulder seam to the cuff, collar from button centre to the end of the buttonhole and length from the high point of the shoulder to the hem.
It is the width of a shirt measured straight across from one armpit seam to the other. Doubling it gives the chest circumference of the garment.
A slim fit has about 8 to 12 cm of chest ease, a regular fit about 12 to 18 cm, and a relaxed fit more. Knit shirts need less than woven ones.
Measure around the base of your neck, leaving a finger of space. Convert to inches and round up to the next half inch.
No. Brands set their own charts, so compare garment measurements, not letter sizes.
Factories allow a small difference from the spec, often plus or minus 1 cm for chest and length and plus or minus 0.5 cm for shoulder and collar. The buyer sets the exact limits.