A shade problem that shows up at the dyeing stage often didn’t start there. Trace it back far enough and it frequently sits in pretreatment, in a scouring step that left residual wax on part of a fabric roll, or a bleaching step that ran unevenly across a batch. Pretreatment doesn’t get the attention dyeing does, mostly because its failures show up downstream rather than immediately, but it’s arguably the stage where getting the chemistry right matters most for everything that follows.
Desizing: Removing What Weaving Left Behind
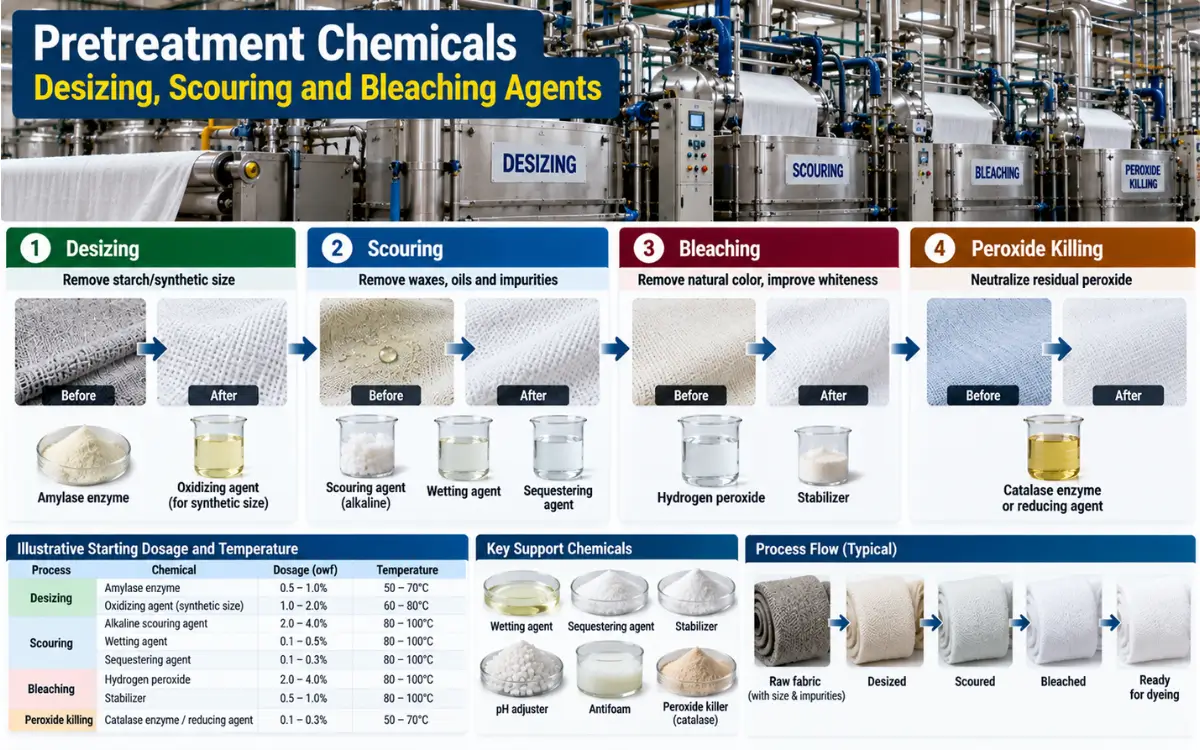
Woven fabric arrives at wet processing coated in sizing agent, a starch or synthetic polymer applied to yarn before weaving to help it withstand the mechanical stress of the loom. That sizing has to come off before the fabric will take dye evenly, since it physically blocks dye and chemical penetration into the fiber.
Enzymatic desizing, using amylase enzymes specifically formulated to break down starch-based sizes, is the dominant method in current practice, valued for working under relatively mild conditions with minimal fiber damage, and covered in more depth in dedicated pieces on enzyme desizing and desizing classification. Amylase dosage and the process temperature and pH window need to match the specific enzyme product’s active range, since enzymes outside their designed conditions lose effectiveness quickly rather than degrading gradually.
Oxidative desizing, using agents like hydrogen peroxide or persulfates, handles synthetic sizing agents that enzymatic methods don’t break down effectively, though it’s used more selectively than enzymatic desizing given its higher potential for fiber damage if not carefully controlled.
A simple absorbency test, checking how quickly a water droplet absorbs into treated fabric, gives a fast, practical check on whether desizing has been effective before the fabric moves to scouring, without needing a full lab analysis for every batch.
Scouring: Removing Natural and Added Impurities
Scouring removes natural fiber impurities, waxes, oils, and pectins in cotton, along with any remaining processing residues, using an alkaline scouring agent typically combined with a wetting agent that helps the scouring liquor penetrate the fiber evenly.
Wetting agents reduce the surface tension of the treatment bath, letting it penetrate fiber structure more completely and evenly, which matters because uneven liquor penetration during scouring is one of the more common causes of patchy dye uptake later in the process, since incompletely scoured areas resist dye differently than properly scoured ones.
Sequestering agents, added during scouring in many recipes, bind metal ions present in the water supply or in the fiber itself, preventing those metal ions from causing localized discoloration or interfering with subsequent bleaching and dyeing steps.
Scouring dosage and time depend heavily on fiber type and the fabric’s specific impurity load, and running scouring conditions matched to a “standard” recipe without accounting for a specific fiber batch’s actual condition is a common source of inconsistent pretreatment results between otherwise similar fabric lots.
Bleaching: Preparing Fabric for Even Dye Uptake
Bleaching removes natural coloring matter and any impurities scouring didn’t fully address, and it’s essential for pale and bright shades where any residual natural color would show through the final dyed result. This classification of bleaching covers the objectives and methods behind this step in more depth. Hydrogen peroxide bleaching dominates current practice, generally preferred over older chlorine-based methods for its more consistent whiteness result and better fiber safety profile under properly controlled conditions.
Peroxide bleaching runs under alkaline conditions, with temperature, time, and peroxide concentration all needing to be balanced against fiber type and the fabric’s condition. Too little peroxide, time, or temperature leaves inadequate whiteness and residual impurities. Too much risks fiber damage, particularly tensile strength loss that may not be immediately visible but shows up later as reduced fabric durability.
Peroxide Killing: A Step That Gets Skipped Too Often
After peroxide bleaching, residual peroxide left in the fabric will interfere with subsequent dyeing, particularly with reactive dyes, causing shade inconsistency or poor dye fixation. A peroxide killer, typically an enzyme-based product (catalase) or a chemical reducing agent, neutralizes this residual peroxide before the fabric moves to dyeing.
Skipping or under-dosing this step is a more common cause of dyeing problems than mills often realize, since the resulting shade issue shows up at the dyeing stage and gets diagnosed as a dyeing problem when the actual root cause sits one stage earlier in pretreatment.
Illustrative Starting Dosage Ranges
The table below gives illustrative starting ranges for a first trial, to be confirmed and adjusted against the specific chemical product’s data sheet and the fabric actually in process.
| Process | Chemical | Illustrative Starting Dosage | Typical Temperature |
|---|---|---|---|
| Desizing | Amylase enzyme | 0.5-1.0% owf (on weight of fabric) | Moderate, per enzyme’s active range |
| Scouring | Alkaline scouring agent | 2-4% owf | Elevated |
| Scouring | Wetting agent | 0.5-1.0 g/L | Elevated |
| Bleaching | Hydrogen peroxide (35%) | 3-6% owf | High |
| Peroxide killing | Catalase enzyme or reducing agent | 0.2-0.5% owf | Moderate |
owf means “on weight of fabric,” a standard textile dosing convention expressing chemical quantity as a percentage of the fabric’s dry weight being processed, distinct from dosing calculated against liquor weight, which is the more common convention for dyeing-stage auxiliaries covered elsewhere.
Typical Dosage Ranges and Why They Vary So Much
Dosage figures for pretreatment chemicals vary considerably based on fiber type, fabric construction, the specific chemical product’s concentration and activity, and water quality, which is why generic dosage tables should be treated as a starting point for trials rather than a fixed recipe to apply blindly. A chemical supplier’s technical data sheet for the specific product in use, combined with trial runs on the actual fabric being processed, gives a far more reliable dosage than a general industry figure, since even two products marketed as functionally similar can require meaningfully different dosing to achieve the same result.
Sequencing Pretreatment Steps
The order these steps run in matters as much as getting each individual step’s chemistry right. Desizing generally runs first, since sizing agent left in place would interfere with how effectively subsequent scouring chemistry can penetrate and clean the fiber. Scouring follows desizing, removing natural impurities from a fiber surface that’s now free of the sizing coating that would otherwise block access to it. Bleaching comes after scouring, working on a fiber that’s already had its natural impurity load reduced, which makes bleaching more effective and more predictable than attempting it on unscoured fabric. Running these steps out of sequence, or attempting to combine them into a single bath to save process time, is a real option in some mills’ recipes but requires considerably more careful chemistry balancing to avoid one step’s chemical environment interfering with another’s effectiveness, and isn’t a substitute for understanding why the standard sequence works the way it does.
Running a Proper Pretreatment Trial
Any new fiber source, fabric construction, or chemical product entering pretreatment deserves a trial run before full production, following a consistent protocol: run the proposed desizing, scouring, and bleaching sequence on a representative sample, check absorbency after desizing, check whiteness and residual impurity visually and, where warranted, through a standard whiteness index measurement after bleaching, and confirm peroxide killing has been effective before releasing the sample to a dyeing trial. Only once a pretreatment trial has passed these checks should the same recipe move to a dyeing trial, since dyeing a poorly pretreated sample wastes dye and time diagnosing a problem that actually originated a stage earlier.
Keeping Batch Records That Actually Help Diagnose Faults
When a shade or fastness problem does surface downstream, the speed of tracing it back to its actual pretreatment cause depends heavily on whether proper batch records exist to check against. A mill that logs actual dosage, time, and temperature for every pretreatment batch, not just the recipe’s intended target values, has something concrete to review when a fault appears weeks later in a different department. Without that record, diagnosis becomes guesswork based on what the recipe was supposed to run, rather than verification of what actually happened in that specific batch, which matters because real-world execution drifts from intended recipe values more often than most mills without a disciplined logging habit would assume.
Who Should Own Pretreatment Quality
Pretreatment often falls organizationally between the fabric receiving function and the dyeing department, and this in-between position can leave it without a clearly accountable owner in some mills. Assigning clear ownership for pretreatment quality control, someone whose role specifically includes reviewing absorbency and whiteness test results, maintaining the batch records covered above, and flagging trends before they become full-blown production problems, closes a gap that otherwise tends to leave pretreatment as everyone’s shared background responsibility and, in practice, nobody’s primary focus.
Common Faults Traced Back to Poor Pretreatment
Uneven dye uptake and patchy shade frequently trace back to incomplete or uneven scouring, where some areas of the fabric retain more natural impurity than others and therefore take dye differently. Poor wash fastness can trace back to incomplete desizing, where residual sizing agent physically blocks dye penetration into the fiber core, leaving dye sitting closer to the surface where it washes out more easily. Fiber strength loss discovered late, sometimes not until a garment fails in wear, often traces back to over-aggressive bleaching conditions that weakened the fiber structure without leaving an obviously visible sign at the pretreatment stage itself. Residual peroxide shade problems, as covered above, trace back to inadequate peroxide killing before dyeing begins.
In each case, the fault surfaces at a later stage than its actual cause, which is exactly why pretreatment deserves the same quality control rigor as dyeing itself, even though it’s the less visible, less discussed stage of the process.
Frequently Asked Questions
What’s the fastest way to check if desizing was effective?
A simple absorbency test, checking how quickly a water droplet absorbs into treated fabric, gives a fast, practical check before moving to scouring, without needing a full lab analysis for every batch.
Why does peroxide killing matter after bleaching?
Residual peroxide left in the fabric interferes with subsequent dyeing, particularly reactive dyes, causing shade inconsistency. This step is skipped or under-dosed more often than mills realize, and the resulting shade problem gets misdiagnosed as a dyeing issue.
Can pretreatment steps be combined to save process time?
It’s possible but requires considerably more careful chemistry balancing, since combining steps risks one stage’s chemical environment interfering with another’s effectiveness. The standard sequence, desize, scour, bleach, exists for a reason.
What causes uneven dye uptake across a single fabric roll?
Most often uneven or incomplete scouring, where some areas retain more natural impurity than others and therefore take dye differently once the fabric reaches the dyebath.