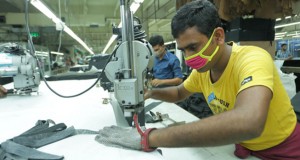
In garments manufacturing fabric, cutting means to cut out the garment’s pieces from lays of the fabric with the help of cutting template or marker. Cutting is one of the major steps to make a complete garment. For cutting of fabric generally, the marker is applied to the top ply of a lay.
Process Sequence of Fabric Cutting Section
In garments manufacturing industry the term cutting is used in a different meaning. Here the term cutting is used in the sense of cutting room which indicates an area that normally includes the activities of marker planning, spreading, and preparation for sewing.
Stages of fabric cutting
Generally, fabric cutting is carried out with two stages. They are as follows:
- A cutting (Separating the individual pieces.)
- A final cutting ( accurate cutting of the individual shapes)
Objectives of Cutting
- To separate fabric parts from the spread of lay according to the dimension of the marker.
- To make the garments according to the required design and shape.
- To prepare garments pieces to go forward with the next process of garments manufacturing.

The requirement of Fabric Cutting
To achieve the required objectives by cutting fabric in the garments manufacturing process, the following requirements must be fulfilled.
- The precision of the cut
- Clean edges
- Unscorched, infused edges
- Support of the lay
- Consistent cutting
Different types of fabric cutting
There are mainly three types of cutting techniques. They are as follows:
- Completely by manual
- By hand-operated Scissor.
- Manually operated powered knife
- Straight knife
- Band blade
- Round blade
- Die cutter
- Notcher
- Drill
- Computerized technique
- Knife cutting
- Cutting by water jet
- Laser cutting
- Plasma torch cutting
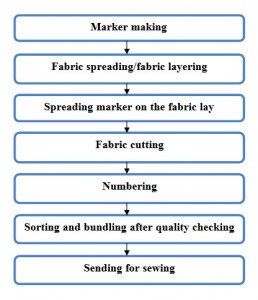
Flow Chart of fabric cutting
Flow Chart of Fabric Cutting
Working procedure in fabric cutting section
- By following production planning at the first sample is collected from the sample section with patterns and garments approved.
- Lay order sheet/ratio sheet fill up by cutting section
- Item, fabric width, color, etc.
- After putting all information in the order sheet then send it to the CAD section for marker making. Or if it is to do manually than make marker manually.
- Checking marker after getting a marker.
- Sending fabric requisition from cutting section to store for cutting according to plan.
- Receiving fabric in cutting table as per marker and cutting plan.
- Matching fabric to trim card by merchandiser approved fabric.
- Then starting layering manually or with the machine.
- Completing layering then spread marker upon on the fabric.
- Marker checking by quality people & keep all documents of style, size wise report to send to the store & sewing section.
- Before cutting attaching clamp and gum tape on the layer.
- If there is any drill mark in marker then need to drill.
- Starting cutting by cutter man.
- Then dividing group and ratio wise.
- Make bundle chart as per lay order sheet and sending for bundle card printing.
- Numbering as per bundle chart-wise.
- Panel checking.
- If there is any fault need to replace cut bundle roll and shade wise then bundle and send to sewing section.
- If there is any fusing or embroidery then send for this process.
Written by
Engineer Sheikh Nurja
B.Sc Engineer of Textile


Please tell me what type of clamp and where it is placed on the fabric (step #11). a photo would be appreciated.
Thank you very kindly
DD
Sir can you tell me about of textile lab testing
Thanks for your writing. It’s essential for a textile engineer.
thanks a lot
Thanks a lot for good writing .
Very nice writing.