As a professional painter with years of experience in Commerce City, CO, I’ve tackled countless paint removal projects, from peeling Victorian trim to weathered farmhouse siding. Selecting the right tools for paint stripping is the foundation of a successful project, whether you’re a DIY enthusiast or a homeowner preparing for a fresh coat. Paint stripping isn’t just about scraping off old layers—it’s about doing it safely, efficiently, and without damaging the underlying surface. In this guide, I’ll walk you through the best tools and techniques for the job, sharing practical tips to help you achieve a clean, ready-to-paint surface.
Why Paint Stripping Matters
Removing old paint is often the first step in refreshing a home’s exterior or interior. Whether you’re dealing with flaking paint on a Craftsman porch or outdated colors on a Colonial’s window frames, proper paint removal ensures a smooth, lasting finish. The wrong tools or techniques, however, can damage wood, metal, or siding, leading to costly repairs. That’s why choosing the right tools for paint stripping is critical—it sets the stage for everything that follows.
Before we dive in, a quick note for Commerce City folks: local weather, with its sunny days and cold winters, can make old paint brittle or stubborn. If you’re looking to discover tips on wood paint removal, check out this helpful resource from Paint Coat & Seal. For professional assistance, you can also learn about our professional painting solutions here to ensure your project is done right.
Understanding Paint Stripping Methods
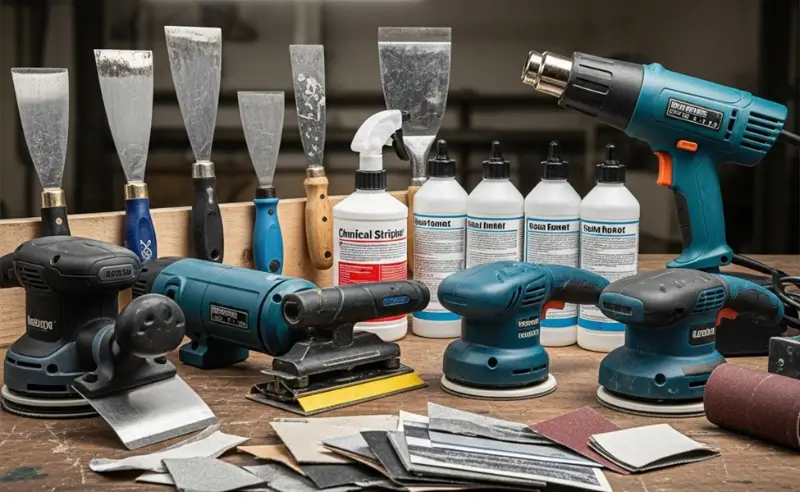
Paint stripping generally falls into four categories: chemical, heat, mechanical, and sanding. Each method requires specific tools, and the best choice depends on the surface, paint type, and project scope. Here’s a breakdown of each approach and the tools you’ll need.
Chemical Paint Strippers
Chemical strippers are liquids or gels that break down paint, making it easy to scrape off. They’re ideal for intricate surfaces like Victorian trim or historic home paint colors on detailed moldings. In one project, I used a citrus-based stripper to remove layers of old paint from a Commerce City Victorian’s gingerbread trim, preserving the wood’s delicate details.
Tools Needed:
- Chemical stripper: Choose a low-VOC, eco-friendly option for indoor use or a stronger solvent for exterior projects. Brands like Citristrip or Klean-Strip are reliable.
- Paintbrush or sprayer: For applying the stripper evenly.
- Plastic or metal scraper: To remove softened paint without gouging the surface.
- Protective gear: Gloves, goggles, and a respirator are non-negotiable to stay safe from fumes.
- Drop cloths: To protect surrounding areas from drips.
Pro Tip: Apply stripper in small sections and follow the manufacturer’s dwell time. Too long, and it can dry out; too short, and it won’t work. Always neutralize the surface with water or a recommended solution before repainting.
Heat-Based Paint Removal
Heat guns soften paint, allowing you to scrape it off with minimal effort. They’re great for traditional home exterior colors on wood siding or window frames. I once used a heat gun to strip layers of paint from a Craftsman bungalow’s porch, revealing beautiful wood grain underneath.
Tools Needed:
- Heat gun: Look for one with adjustable temperature settings (around 500-1,200°F) for control.
- Putty knife or scraper: A wide, flat blade works best for lifting softened paint.
- Heat-resistant gloves: To protect your hands from burns.
- Fire extinguisher: Safety first—heat guns can ignite debris if you’re not careful.
Pro Tip: Keep the heat gun moving to avoid scorching wood. Work in small areas and scrape immediately while the paint is soft. Avoid heat on lead-based paint (common in older homes) to prevent toxic fumes.
Mechanical Paint Stripping
Mechanical methods, like wire brushing or scraping, are best for small, stubborn areas or metal surfaces. They’re labor-intensive but effective for ranch style house paint ideas on fences or gates. In a Commerce City ranch home project, we used wire brushes to clean up rusty metal railings before repainting.
Tools Needed:
- Wire brush: Manual or powered (for drills) for removing loose paint or rust.
- Scrapers: Various sizes for precision work on trim or flat surfaces.
- Sanding block: For smoothing after scraping.
- Dust mask and goggles: To protect against debris.
Pro Tip: Use mechanical methods sparingly to avoid damaging delicate surfaces. Pair with chemical or heat methods for larger areas to save time.
Sanding for Paint Removal
Sanding is ideal for smoothing surfaces after other methods or removing thin paint layers. It’s perfect for prepping farmhouse exterior colors on smooth siding. I once sanded a farmhouse’s weathered clapboards to create a flawless base for a crisp white finish.
Tools Needed:
- Orbital sander: For large, flat surfaces like siding.
- Sanding sponges: For curved or detailed areas.
- Sandpaper: Start with coarse (60-80 grit) for heavy paint, then fine (120-220 grit) for smoothing.
- Shop vacuum: To control dust and keep your workspace clean.
- Dust mask and safety glasses: Essential for health and visibility.
Pro Tip: Sand in the direction of the wood grain to avoid scratches. For large projects, consider renting a professional-grade sander for efficiency.
Matching Tools to Surfaces
Different surfaces demand different tools. Here’s how to choose:
- Wood: Chemical strippers or heat guns work best to avoid damaging grain. Sanding is great for final smoothing. For Victorian house exterior paint, use a gentle stripper to preserve ornate details.
- Metal: Wire brushes or mechanical scrapers remove rust and paint. Sanding smooths the surface for repainting.
- Concrete: Pressure washers or heavy-duty chemical strippers handle tough paint layers. Avoid heat to prevent cracking.
- Siding: Orbital sanders or chemical strippers are ideal for modern house paint schemes on aluminum or vinyl siding.
In Commerce City, where homes range from Tudor style paint colors to contemporary home paint palettes, always test your tools on a small area first. This ensures you won’t harm unique architectural features.
Safety First: Protecting Yourself and Your Home
Paint stripping can be messy and hazardous, especially with older homes that may have lead paint. Here are key safety tips:
- Test for Lead: If your home was built before 1978, test for lead paint using a kit from a hardware store. If positive, hire a certified professional to avoid health risks.
- Ventilate: Work outdoors or in well-ventilated areas, especially with chemical strippers or heat guns.
- Protect Surfaces: Use drop cloths and painter’s tape to shield windows, plants, or nearby surfaces.
- Clean Up Thoroughly: Dispose of paint chips and chemical residues according to local regulations. In Commerce City, check with waste management for proper disposal.
Preparing for Repainting
Once the old paint is gone, your surface needs to be prepped for a new coat. Clean thoroughly to remove dust or chemical residue. For wood, apply a primer to seal the surface and ensure adhesion. For coastal home exterior paint vibes or Colonial house paint colors, a high-quality primer prevents tannin bleed and enhances color vibrancy.
In one project, we stripped peeling paint from a Commerce City ranch home’s siding, primed it, and applied a fresh taupe palette. The result was a curb appeal architectural style that made the house stand out in the neighborhood.
When to Call a Professional
While DIY paint stripping is rewarding, some projects—especially on historic homes or large surfaces—are best left to pros. Professionals have access to industrial tools and expertise in matching paint to architectural features. They can also navigate HOA rules or local regulations in Commerce City, ensuring your project is compliant and stunning.
Getting Started with Confidence
Choosing the right tools for paint stripping is about understanding your project’s needs and prioritizing safety and efficiency. Whether you’re refreshing a Craftsman home paint colors exterior or prepping a modern facade, the right tools make all the difference. Test your methods, protect your surfaces, and don’t rush—proper prep leads to a flawless finish.
In my years of painting, I’ve seen how a well-stripped surface transforms a home, setting the stage for colors that pop and last. So, grab your tools, plan your approach, and get ready to reveal your home’s true potential.